
Names and Functions of Control Panel Keys
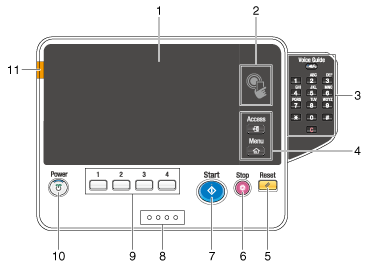

This figure shows an optional Keypad KP-101 installed.
No. | Name | Description |
|---|---|---|
1 | Touch Panel | Displays setting screens and messages. Directly press this panel to carry out operations. |
2 | Mobile touch area | Used to associate this machine with an NFC-compatible Android terminal. You can place an Android terminal with ineoPRINT for Android installed on the mobile touch area to register this machine or to perform user authentication.
This area is also used to associate this machine with an iOS terminal that supports Bluetooth LE. The optional Local Interface Kit (voice guidance / Bluetooth LE compatible) is required to use the Bluetooth LE function. Bringing the iOS terminal closer to this machine allows you to register this machine or perform user authentication with an operation from ineoPRINT for iPhone/iPad.
|
3 | Keypad KP-101 | Keypad: Use this keypad to enter numeric values such as the number of copies or zoom ratio. This keypad is also used to select a numbered setting key. |
C (Clear): All the numeric values(number of pages, magnification, size, etc), which have been entered by keypad, are canceled. | ||
Voice Guide: Allows you to use the voice guidance function, which is one of the advanced functions. Press this key to start or end the voice guidance when the Enlarge Display, Accessibility, or Guidance screen is displayed on the Touch Panel.
| ||
4 | Access | Press this key to perform authentication in the Login screen if user authentication or account track is installed on this machine. Pressing the Access key while logged in will log you out of this machine.
|
Menu | Press this key to display the Main Menu. The Main Menu displays shortcut keys assigned to selected functions, enabling you to quickly access a desired function.
| |
5 | Reset | Press this key to reset the settings you entered or changed on the Control Panel. |
6 | Stop | Press this key to temporarily stop an active copy, scan, or print job.
|
7 | Start | Press this key to start an operation such as copying, scanning, faxing, or printing.
If this indicator lamp lights up orange, check whether any warning or message is displayed on the Touch Panel. |
8 | Data Indicator | Flashes or lights up to indicate the data receiving status on this machine. For details, refer to Here. |
9 | 1 - 4 | Press each key to switch the display of the Touch Panel to a function assigned to a Register key.
|
10 | Power key | Press this key to switch this machine to the Power Save mode.
|
11 | Warning Indicator | Indicates the status of this machine by the lamp color, flashing, or a lamp lighting up.
|

If necessary, you can adjust the angle of the Control Panel to make it easier use. For details on the adjustment, refer to Here.