
Remote Panel Client Settings
Click [Remote Panel Settings] - [Remote Panel Client Settings] on the menu of [Network] tab to display this screen.
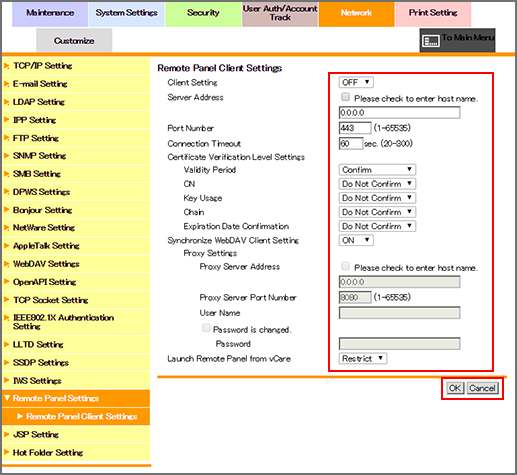
Select whether the administrator permits the customer engineer to operate the remote panel using the remote diagnosis system.
Enabling this setting displays the [Remote Panel Operation] button on the [Utility Menu] of the main body. For details, contact your service representative.
To operate the control panel of the machine, select [ON] from the [Client Settings] drop-down list.
In [Server Address], enter the address of the server to which the dedicated software has been installed.
If necessary, specify [Port Number] and [Connection Timeout].
If you want to verify certificates for communication via SSL, select items to be verified and set each item.
[Validity Period]: Checks whether the certificate's validity period is still valid.
[CN]: Checks whether the Common Name (CN) of the certificate is identical to the address of the server.
[Key Usage]: Checks whether the certificate is used according to the intended usage approved by the issuer of the certificate
[Chain]: Checks whether or not the certificate chain (certificate pass) has a problem. The chain is verified by referring to the external certificates managed by the machine.
[Expiration Date Confirmation]: Checks whether or not the certificate has expired.
If you want to use a proxy server to access the server to which the dedicated software has been installed, register the proxy server. To synchronize it with WevDAV client settings, select [ON] from the [Synchronize WebDAV Client Settings] drop-down list. If you do not want to synchronize it, configure the proxy server settings such as server address.
Click [OK]. Clicking [Cancel] cancels the setting.
Click [OK] on the setting complete screen.