
Calibrate
This section describes how to print a chart and measure it by using the selected colorimeter.
To measure a chart, install the driver of your colorimeter. For details, refer to the manual supplied with the colorimeter.
According to the colorimeter, operations differ. For details about the operation procedure, refer to the manual supplied with each colorimeter.
You cannot change the colorimeter during this operation.
On the [Calibration Manager] screen, click [Start Calibration].
The [Execute Calibration] screen is displayed.
Click [Print].
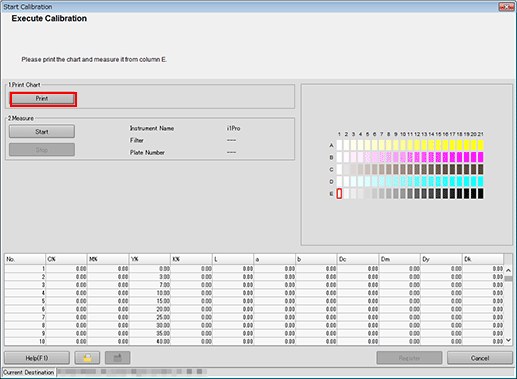
The [Print Chart] screen is displayed.
Set the number of copies and select a paper tray.
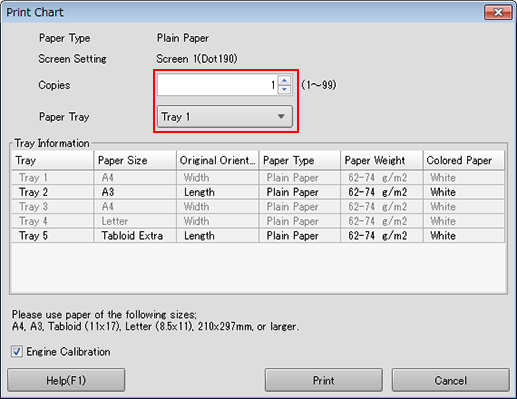
For the number of copies, set a value between 1 and 99 inclusive.
The settings are preserved, and displayed when this screen is accessed next time.
To perform Engine Calibration, select the check box.
Click [Print].
Chart printing is executed. The [Start Calibration] screen returns after printing has been completed.
Connect the colorimeter to your computer.
Click [Start].
A measurement starts.
After finishing the measurement, the result of the measurement is displayed in the list, and patches in the preview area are colored.
An operation screen for the colorimeter appears. Follow the instructions on the windows that follow.
If you measure a wrong line, a warning message appears. You can select either to try again with the correct line or to proceed to the next line.
To stop the measurement, click [Stop].
After the acquirement of measurement data, [Register] becomes available.
Before measurement, patches are displayed in gray, but after the measurement, patches are displayed in color.
The value of each patch appears in the measurement result list.
When you click a color patch of the preview area, the corresponding line is selected in the measurement result list. On the other hand, when you select the line in the measurement result list, the corresponding color patch is selected in the preview area.
If necessary, you can also click
 or
or  to save the measurement result to the local disk or load the saved measurement result.
Click [Register], and then click [OK] on the confirmation screen.
[Start Calibration] screen closes, and the [Calibration Manager] screen returns.
The measurement result is displayed in the list on the [Calibration Manager] screen.
To close the [Start Calibration] screen upon discarding the measurement result, select Cancel. The screen returns to the [Calibration Manager] screen.
The list on the [Calibration Manager] screen displays all measurement results until the [Calibration Manager] screen is closed or reset.
To review the measurement result, go to Measure the Calibration Accuracy.