
CMYK-CMYK DLP (Creation): Specify Color Conversion
On the Customize Color Conversions screen, you can set the rendering intent, the preserve mid-tone and preserve solid.
Rendering intents are methods to convert color spaces. CMYK-CMYK conversion maintains gradation.
By partially compressing the input gamut, the conversion matches the color space with the output gamut.
The CMYK conversion has similar gamuts, so the partial compression is carried out.
From [CMYK-CMYK Conversion] - [Rendering Intent], select the rendering intent.
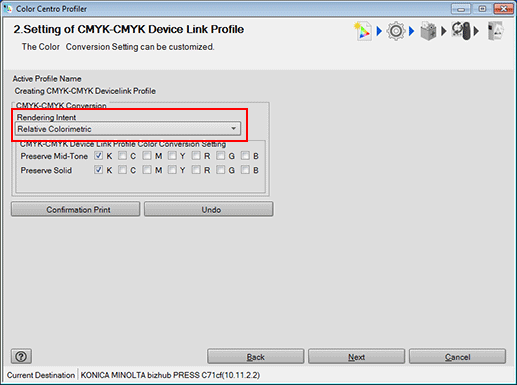
[Relative Colorimetric] is the setting to execute color conversion regarding the paper color as completely white. The paper color parts are represented as colorlessness after color conversion.
[Absolute Colorimetric (Simulate Paper Color)] is the setting to execute color conversion maintaining the measurement value of the paper color. The paper color parts are represented with the color near the actual paper color after color conversion. When you select [Absolute Colorimetric (Simulate Paper Color)], [Preserve Mid-Tone] and [Preserve Solid] (except for K) are not available.
When you make all contents of the setting on the screen the same content as recommended setting, click [Undo].
When you set the preserve mid-tone for one color, check [Preserve Mid-Tone] of that color.
[Preserve Mid-Tone] is a setting to recompose the color after the color conversion as the same one color which has composed the color before the color conversion.
The setting of [C], [M], [Y] and [K] is the setting for the color composed of C/M/Y/K only.
The setting of [R] is the setting for the color composed of [M] and [Y].
The setting of [G] is the setting for the color composed of [C] and [Y].
The setting of [B] is the setting for the color composed of [C] and [M].
When [Absolute Colorimetric (Simulate Paper Color)] is selected, you cannot specify [Preserve Mid-Tone] and [Preserve Solid] at the same time.
When you set the preserve solid for one color, check [Preserve Solid] for that color.
[Preserve Solid] is a setting to represent the solid part after the color conversion with the same color which is used for the solid part before the color conversion.
The setting of [C], [M], [Y], and [K] is the setting about the color composed of C/M/Y/K only.
The setting of [R] is the setting for the color composed of [M] and [Y].
The setting of [G] is the setting for the color composed of [C] and [Y].
The setting of [B] is the setting for the color composed of [C] and [M].
When [Absolute Colorimetric (Simulate Paper Color)] is selected, you cannot specify [Preserve Mid-Tone] and [Preserve Solid] at the same time.
Click [Confirmation Print] for the test printing.
[Confirmation Print] screen appears.
Click [Confirmation Print] for the test printing.
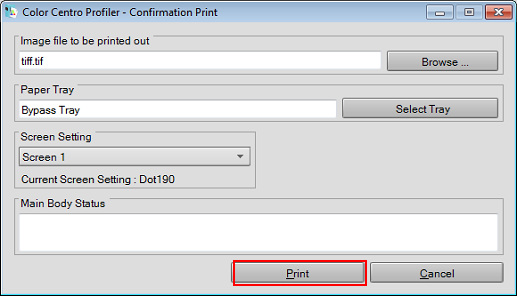
Click [Browse] to display the screen to select the image for printing.
Click [Select Tray] to display the screen to specify the tray used by confirmation printing.
From [Screen Setting], select the screen setting used by confirmation printing.
When you click [Cancel], [Confirmation Print] screen is closed to return to the Customize Color Conversions screen.
Confirm the result of test printing.
Click [Next].
The screen for entering the file name and comment is displayed.