
Creation: Specify Color Conversion
In the Color Conversion Setting screen, you specify the following items:
- Rendering intents for CMYK-CMYK conversion
- Preserve Mid-Tone and Preserve Solid for CMYK objects (image, graphic, and text)
- Rendering intents for RGB objects (image, graphic, and text)
Rendering intents are methods to convert color spaces.
From [CMYK-CMYK Conversion] - [Rendering Intent], select the rendering intent.
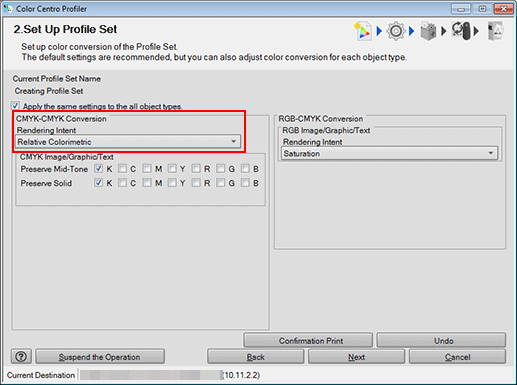
[Relative Colorimetric] is the setting to execute color conversion regarding the paper color as completely white. The paper color parts are represented as colorlessness after color conversion.
[Absolute Colorimetric (Simulate Paper Color)] is the setting to execute color conversion maintaining the measurement value of the paper color. The paper color parts are represented with the color near the actual paper color after color conversion. When you select [Absolute Colorimetric (Simulate Paper Color)], [Preserve Mid-Tone] and [Preserve Solid] (except for K) are not available.
When you make all contents of the setting on the screen the same content as recommended setting, click [Undo].
When you set the preserve mid-tone for one color, check [Preserve Mid-Tone] of that color.
If you check [Apply the same setting to all the object types], you can apply the same settings to all images, graphics, and text.
If you remove the check from [Apply the same setting to all the object types], you can apply the different settings to each of the object types, namely, images, graphics, and text.
[Preserve Mid-Tone] is a setting to recompose the color after the color conversion as the same one color which has composed the color before the color conversion.
The setting of [C], [M], [Y] and [K] is the setting for the color composed of C/M/Y/K only.
The setting of [R] is the setting for the color composed of [M] and [Y].
The setting of [G] is the setting for the color composed of [C] and [Y].
The setting of [B] is the setting for the color composed of [C] and [M].
In some cases, you cannot set [Preserve Mid-Tone] and [Preserve Solid] at the same time.
In [Preserve Solid], check the color to which to apply Preserve Solid.
If you check [Apply the same setting to all the object types], you can apply the same settings to all images, graphics, and text.
If you remove the check from [Apply the same setting to all the object types], you can apply the different settings to each of the object types, namely, images, graphics, and text.
[Preserve Solid] is a setting to represent the solid part after the color conversion with the same color which is used for the solid part before the color conversion.
The setting of [C], [M], [Y], and [K] is the setting about the color composed of C/M/Y/K only.
The setting of [R] is the setting for the color composed of [M] and [Y].
The setting of [G] is the setting for the color composed of [C] and [Y].
The setting of [B] is the setting for the color composed of [C] and [M].
In some cases, you cannot set [Preserve Mid-Tone] and [Preserve Solid] at the same time.
From [RGB-CMYK Conversion] - [Rendering Intent], select the rendering intent.
If you check [Apply the same setting to all the object types], you can apply the same settings to all images, graphics, and text.
If you remove the check from [Apply the same setting to all the object types], you can apply the different settings to each of the object types, namely, images, graphics, and text.
[Perceptual] is the recommended setting for Image objects. It enables color reproduction using colors close to those before the conversion.
The gradation is retained by compressing the whole data.
This option is suitable for photographs.
[Saturation] is the recommended setting for Graphics objects and Text objects. It enables reproduction with colors retaining the vividness as close as possible to the colors before the conversion.
Color shades become more vivid by being converted closer to the high saturation area (the outside of the CMYK color gamut).
This option is suitable for presentation materials.
Click [Confirmation Print] for the test printing.
[Confirmation Print] screen appears.
Click [Print] for the test printing.
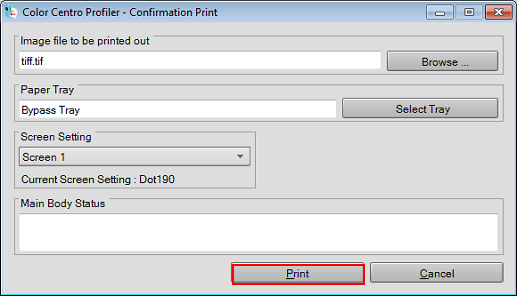
Click [Browse] to display the screen to select the image for printing.
Click [Select Tray] to display the screen to specify the tray used by confirmation printing.
From [Screen Setting], select the screen setting used by confirmation printing.
When you click [Cancel], [Confirmation Print] screen is closed to return to the Customize Color Conversions screen.
Confirm the result of test printing.
Click [Next].
The Comment screen appears.