
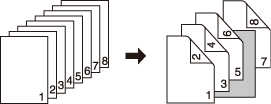
Insert Sheet: Adding a Front Cover or Insert Paper
Use this function in print mode or blank mode to insert chapter sheets or separator sheets into the finished set, as well as front and back covers. You can select whether to add the original in print mode or blank mode upon setting the Front/Back cover and insert sheets. The covers and insert sheets can be fed from a tray source other than that of body sets. When Post Inserter PI-502 is installed, paper feeding is also possible from the post inserter. If a Post Inserter is available, a blank cover or insert sheet can be inserted.
Front/Back Cover setting
There are the following options which can be selected for Front/Back Cover setting. Front Cover (Print or Blank) and Back Cover (Print or Blank) can be configured individually.
Setting options | Description |
|---|---|
Front Cover + Print |
|
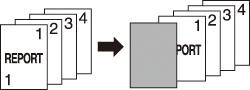
Front Cover + Blank | A blank sheet for a front cover will be inserted as the first sheet, regardless of the printing mode (simplex/duplex) of the original or copied set.
|
Back Cover + Print |
 |
Back Cover + Blank | A blank sheet for a back cover will be inserted as the last sheet of copied set, regardless of the simplex/duplex printing mode of the original or copy. 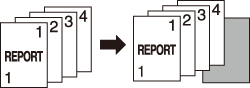 |
Insert Sheet setting
Insert Sheet setting produces various output depending on the [simplex/duplex] setting of the original and copy type or the [simplex/duplex] setting of insert paper.
Example: Selecting [Print] with page [5] specified as insertion location
Setting options | Description |
|---|---|
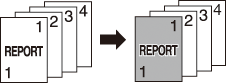
[1->1] | The 5th sheet of single-sided original is copied onto the insert sheet, which will be the 5th sheet of copied set. An insert sheet cannot be duplex-copied.
|
[1->2] |
|
[2->2] | The 5th sheet (the 9th and 10th pages) of double-sided original is printed onto both sides of the insert sheet, which will be the 5th sheet of copied set. An insert sheet cannot be simplex-copied. 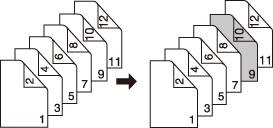 |
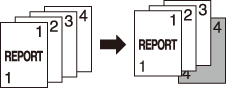
[2->1] | The 5th sheet (the 9th and 10th pages) of double-sided original is simplex-copied onto 2 insert sheets, which will be the 9th and 10th sheets of copied set. An insert sheet cannot be duplex-copied.  |

Example: Selecting [Blank] with page [5] specified as insertion location
Setting options | Description |
|---|---|
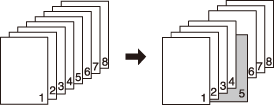
[1->1] | A blank sheet will be inserted after the 5th sheet of single sided original is simplex-copied.
|
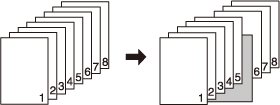
[1->2] | A blank sheet is inserted after the 5th and 6th sheet of single-sided original are duplex-copied. With page [6] specified, the output result will be the same.
|
[2->2] | A blank sheet will be inserted after the 5th sheet (the 9th and 10th pages) of double-sided original are duplex-copied.  |
[2->1] | A blank sheet will be inserted after the 5th sheet (the 9th and 10th pages) of double-sided original are simplex-copied. A sheet cannot be inserted after an odd-numbered page of copied set. 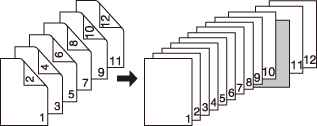 |
Use ADF. If the number of original pages count exceeds the maximum stack capacity of the ADF, select [Separate Scan]. If the Separate Scan mode is used together, the Original Glass is also available.
Covers, insert sheets, and text paper can be loaded into different trays, but their sizes must be the same. (The Auto Zoom function works. )
For front and back covers, one sheet can be fed from Tray1 to Tray5, and up to 40 sheets from the post inserter individually or simultaneously. In this case, the covers loaded in the post inserter are fed at the beginning (front cover) and at the end (back cover).
Up to 100 types of insert sheets can be specified in the range of 1 to 999 pages separately from front and back covers. Also, up to 40 sheets can be inserted into one location from the post inserter.
Position the original.
Load paper into the tray.
Load sheets to be used as front and back covers, sheets to be used as insert sheets, and sheets for text copy into any tray. To use the post inserter, load sheets into the tray of the post inserter. All the sheets to be loaded here must have the same size.

Before loading sheets, be sure to check paper information for each tray and use the appropriate sheets set to each tray. If the sheets loaded into a tray is different from the setting, it may cause a copy failure or trouble.
Specify [Simplex/Duplex] for the original or copy.
Display the COPY screen and press the desired button under [Simplex/Duplex]. [Simplex/Duplex] in the copy side selected at this time is applied to the printed side of a cover or insert sheet.
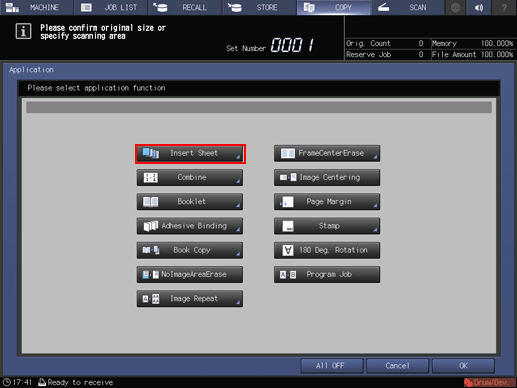
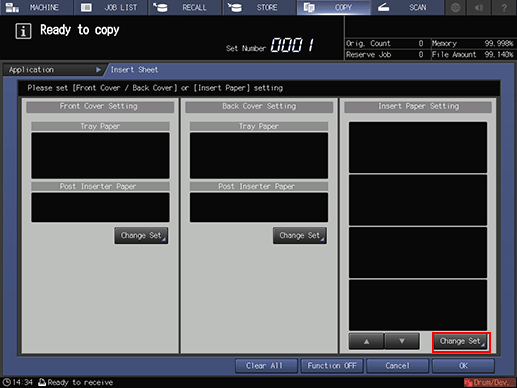
Press [Application] on the [COPY] screen.
Press [Insert Sheet] on the [Application] screen.
Add a cover.
To add a front cover, press [Change Set] under [Front Cover Setting]. To add a back cover, press [Change Set] under [Back Cover Setting].
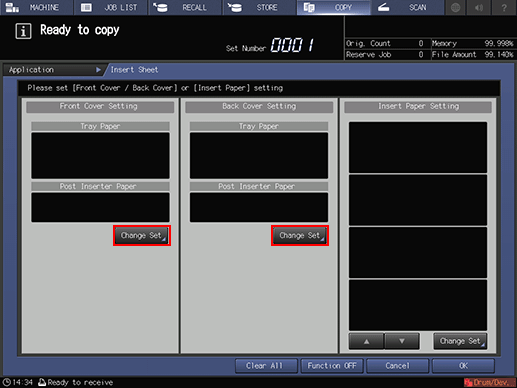
[Front Cover Setting] screen

[Back Cover Setting] screen

Set the following options as necessary.
[Tray paper]
Cover print
To add a front cover with a copy, press [With Cover (Print)]. To add a front cover with blank paper, press [With Cover (Blank)].
Print side
To make 1-sided copy on a cover, press [1-Sided]. To make 2-sided copy, press [2-Sided]. When the screen is first displayed, the print side of the copy is applied in [Simplex/Duplex] you selected in step 3. If [With Cover (Blank)] is selected in the cover print setting, [1-Sided] is selected automatically.
[Post inserter paper]
Post inserter paper
To use the paper loaded in the post inserter as a cover, press [With Cover], then press the desired one of the post inserter tray buttons. If paper is fed from a post inserter tray, printing is not possible.
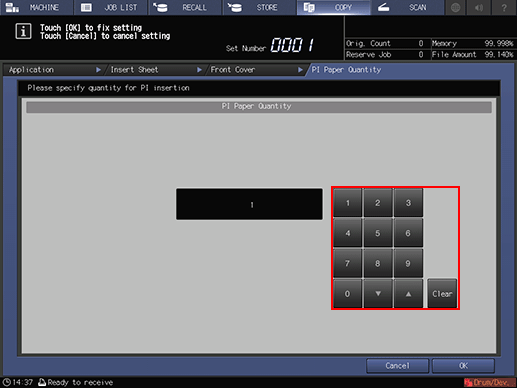
Insertion setting
In the post inserter, up to 40 covers can be added, Press [Insertion Setting], enter the number of sheets using the keypad on the screen, then press [OK].
Covers can be fed simultaneously from both the paper tray and post inserter tray. In this case, the covers loaded in the post inserter are fed as at the beginning (front cover) and at the end (back cover).
[PI Paper Quantity] screen
Press [OK] to return to the [Insert Sheet] screen.
Add an insert sheet.
Press [Change Set] under [Insert Sheet Setting].
In the upper-left side of the screen, [Setting 001] of the setting button is highlighted.

Multiple insert pages can be assigned to a single setting button, but only one type can be specified for printing necessity, printed side, and paper tray setting. To add an insert sheet in a different setting, apply the current setting, then press the next setting button to configure a new setting.
Paper Tray
Select the desired tray button. To use the paper loaded in the post inserter, select the desired one of the post inserter tray buttons. If paper is fed from a post inserter tray, printing is not possible.
Insert sheet printing
To add an insert sheet with a copy, press [Print]. To add it with blank paper, press [Blank].
Print side
To make 1-sided copy on an insert sheet, press [1-Sided]. To make 2-sided copy, press [2-Sided]. When the screen is first displayed, the print side of the copy is applied in [Simplex/Duplex] you selected in step 3. If [Blank] is selected in the insert sheet print setting, [1-Sided] is selected automatically.
Specify the insert page.
Press [Insert Page Setting] to display the [Insert Page Setting] screen.
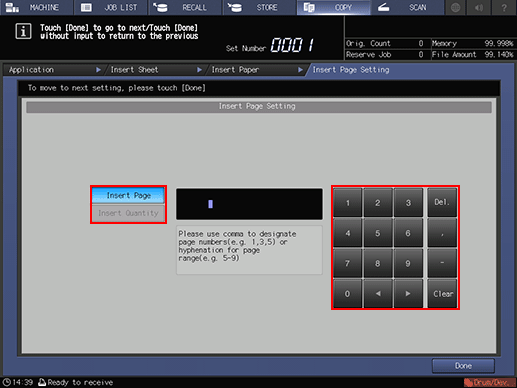
Enter the insert page number using the keypad on the screen. When specifying multiple pages, delimit them with a comma (,). When specifying the range, insert a hyphen (-) between page numbers. Up to 20 characters can be specified, including a command hyphen.
The page numbers are automatically sorted in ascending order. The same page can be specified only once.
Pressing [Delete] deletes the character preceding the cursor. Press [Clear] deletes the information you entered.
If a post inserter tray is selected as a paper tray, specify the number of insert sheets. Press [Insertions], then enter the desired number of sheets using the keypad on the screen. Up to 40 sheets can be specified.

When the setting is completed, press [Done]. This returns to the [Insert Sheet] screen.
If necessary, continue the insert sheet setting.
In the upper-left side of the screen, [Setting 002] of the setting button is highlighted. You can change the setting to add a different type of insert sheet. Up to 100 types can be set.

If the specified page is the same as the previous setting, the higher setting number (the setting assigned later) has priority.
If you press [Clear Setting] in the upper-right side of the screen, the contents of the highlighted setting button is cleared.
When all the settings are completed, press [OK].
This returns to the [Insert Sheet] screen. The screen shows the front cover, back cover, and information configured on the insert sheet setting screen.
Press [OK] to complete the setting.
To resume the original settings, press [Cancel].
To cancel the insert sheet function with the current setting saved, press [Function OFF].
To clear all the setting information, press [Clear All].
Press [OK] on the [Application] screen to return to the [COPY] screen.
The [Inter Sheet] icon and shortcut key are displayed under [Application] on the [COPY] screen.
Enter the desired print quantity from the keypad on the control panel.
Press Start on the control panel.
To add a copied back cover, collectively scan the original before printing it.
Printing does not start without returning to the [COPY] screen. Be sure to display the [COPY] screen.