Page Margin: Adjusting Position of Copy Image
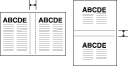
Use this function to create a binding margin on copies in order to make it easier for filing purposes, and also to adjust the position of copy image on both front and back sides when making 2-sided copies, in order to correct the image dislocation.
When [Booklet] or [2 Repeat] mode of Image Repeat has been already selected, this function allows you to make the desired amount of blank space between the two images on a page.
Original | Output |
|---|---|
|
|

Available shift directions are [Top], [Bottom], [Right], and [Left].
Shift amount: 0 mm to 250 mm in 0.1 mm increments
When [Booklet] or [2 Repeat] mode of [Image Repeat] has already been selected, the Page Space key appears clear on the screen to show its availability.
Page Space width: -250.0 mm to 250 mm in 0.1 mm increments
Position the original.
Display the [COPY] screen and press the desired button under [Simplex/Duplex].
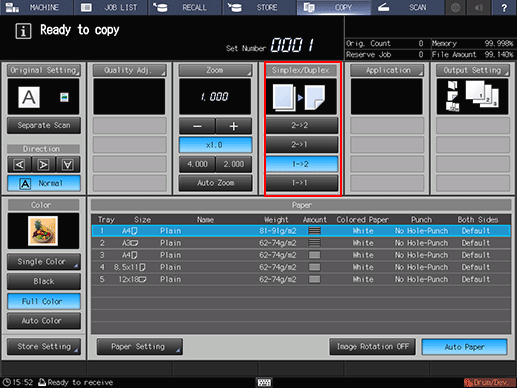
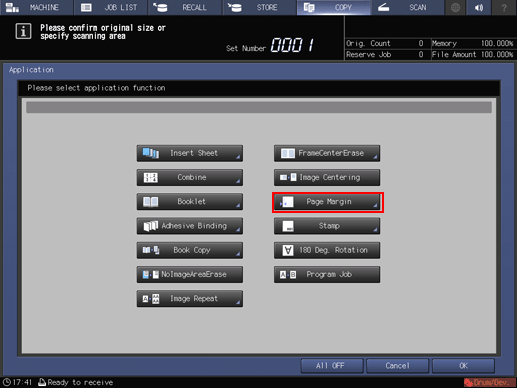
Press [Application] on the [COPY] screen.
Press [Page Margin] on the [Application] screen.
Select the side of copy paper to be adjusted with image position.
Select [Front Side], [Back Side], or [Double Sided] under [Image Side].
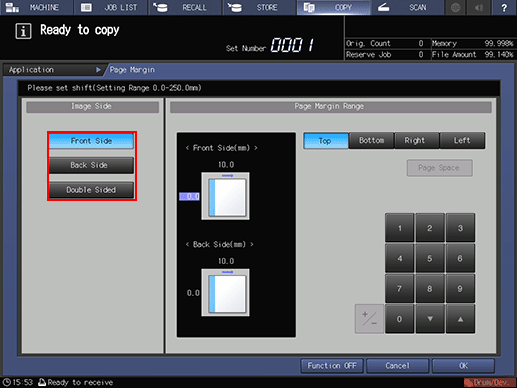
For 1-sided copies, only the front side setting will be effective.
To have the same shift amount on both sides of 2-sided copies, select [Double Sided].
Specify the shift direction and amount.
Use [Top] or [Bottom] to shift the image in lengthwise direction, and [Right] or [Left] in widthwise direction.
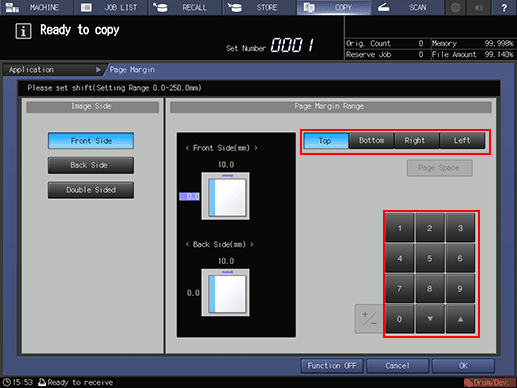
Select the desired shift direction key. Use the touch panel keypad or [
 ][
][ ] to enter the desired shift amount.
Shift amount: 0 mm to 250 mm in 0.1 mm increments
Shift direction should be based on [Direction] specified on the [COPY] screen.
To specify the shift amount individually for the front and back sides, select either [Front Side] or [Back Side] under [Image Side], then enter the shift amount for each as described in step 6.
To use the Page Space function, select [Page Space] and enter the desired page space amount.
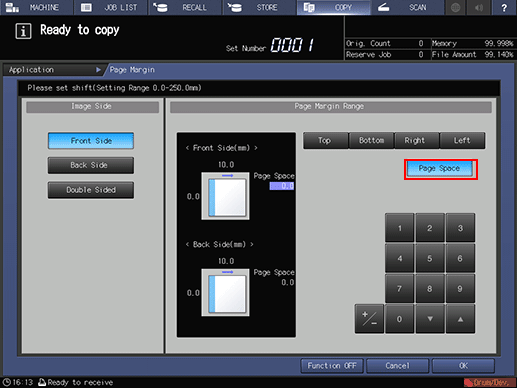
The [Page Space] key appears clear on the screen only when [Booklet] or [2 Repeat] mode of [Image Repeat] has already been selected.
[Page Space] width: -250.0 mm to 250.0 mm in 0.1 mm increments
For the [Page Space] amount, shift direction is not needed to be specified.
Press [OK] to complete the setting.
To resume the original settings, press [Cancel]. To cancel the [Page Margin] function with the current setting saved, press [Function OFF].
Press [OK] on the [Application] screen to return to the [COPY] screen.
The [Page Margin] icon and shortcut key are displayed under [Application] on the [COPY] screen.
Enter the desired print quantity from the keypad on the control panel.
Press Start on the control panel.
Printing does not start without returning to the [COPY] screen. Be sure to display the [COPY] screen.
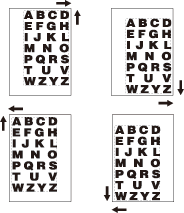
Page Space
The [Page Space] function is available only when [Booklet] or [2 Repeat] mode of [Image Repeat] has already been selected. Use this function to make the desired amount of blank space between the two images on a page.
[Booklet Pagination] | [Page Interval] |
|
|
[2 Repeat] mode of [Image Repeat] | [Page Interval] |
|
|