
Detailed Setting in Stamp
Making fine adjustment on printing position
Make fine adjustments for the printing position of [Set Numbering], [Page No.], [Date/Time], and [Annotation]. The adjustment range is 0 to 50 mm, in lengthwise direction ([Top] or [Bottom]) and in widthwise direction ([Right] or [Left]).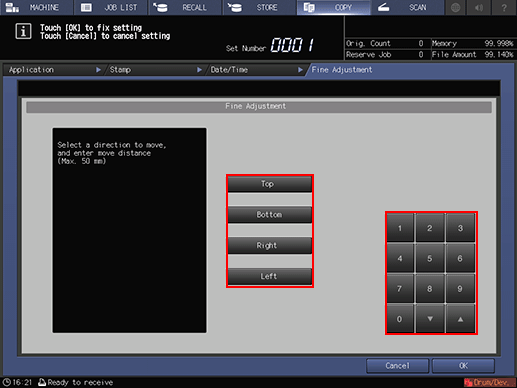
Select the desired direction key, then use [
 ][
][ ] or touch panel keypad to enter the desired amount.
To complete the setting and return to the previous screen, press [OK].
Changing the text size for numbering
Specify the text size for numbering.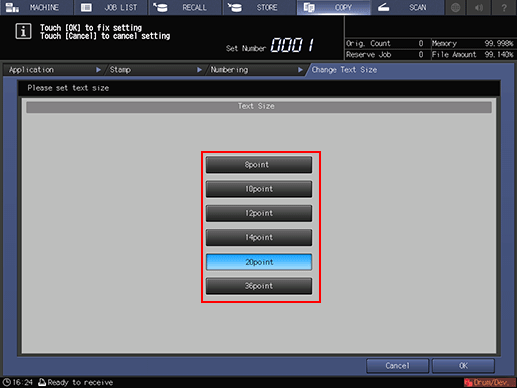
Select the desired Text Size button.
To complete the setting and return to the previous screen, press [OK].
Start Number setting for Set Numbering mode
Pressing [Start Number] on the [Numbering] screen displays the following screen to allow you to set the start number.
Use the touch panel keypad or [
][] to enter the desired start number up to four digits.To complete the setting and return to the previous screen, press [OK].
Page cover and insert sheet
When [Insert Sheet] or [Booklet] is used together, you can specify printing onto the covers and insert sheets (printed or blank).
Select a key from each of the [Cover], [Print Insert], and [Blank Insert] areas.
When [Skip the Page(s)] is selected, an insert sheet will not be counted as a page.
To complete the setting and return to the previous screen, press [OK].
Start Number/Start Page/Last Page setting for Page No. mode
Pressing [Change Page] on the [Page No.] screen displays the following screen to allow you to set the start number, start page, and last page.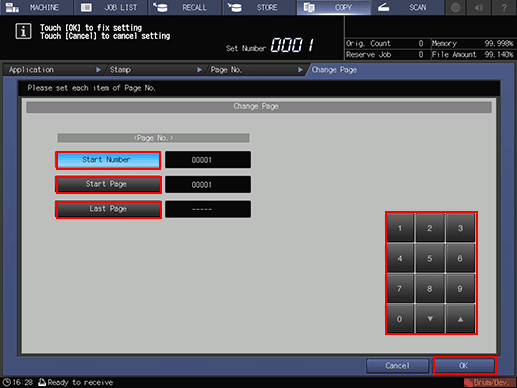
Select [Start Number] under [Page No.], then enter the desired start number.
Use the touch panel keypad or [
][] to enter the start number in the range from [1] to [99999]. Entering [0] automatically sets the start number to [1].
Select [Start Page] under [Page No.], then enter the desired start page.
Use the touch panel keypad or [
][] to enter the start page in the range from [1] to [99999]. Entering [0] automatically sets the start page to [1].
Select [Last Page] under [Page No.], then enter the desired last page.
Use the touch panel keypad or [
][] to enter the last page in the range from [1] to [99999]. To print on all pages, enter [0] to display [-----] (no setting).
To complete the setting and return to the previous screen, press [OK].
Text Size and Font settings for Page No. and Date/Time modes
Use this function to specify the text size and font for Page No. and Date/Time.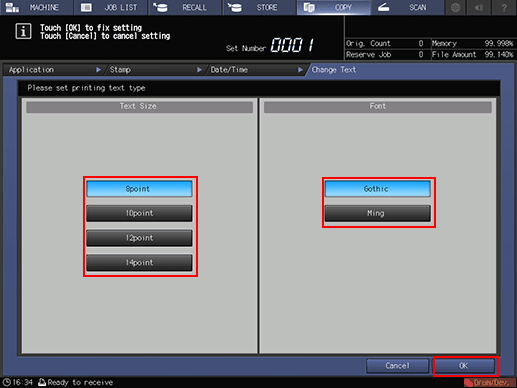
Select one of the four keys under [Text Size].
Select either [Gothic] or [Ming] under [Font].
To complete the setting and return to the previous screen, press [OK].
Date/Time
Use this function to change the date/time to be printed from the one configured for the machine to your desired time/date.
Press [Setting Time].
The area on the right of [Setting Time] will be highlighted.
Press [Set] to select the part to be changed.
Every time [Set] is pressed, the cursor moves to the next field, in the order of month, day, year, and time. Use the keypad on the screen to enter the desired numbers.
To complete the setting and return to the previous screen, press [OK].