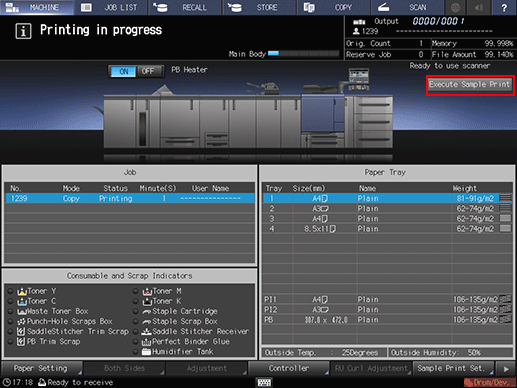
Execute Sample Print: Making Sample Print Manually during Output
When you want to check the quality of printed image during a print job, press [Execute Sample Print] located in the upper part of the [MACHINE] screen to manually make a sample print.
The [Execute Sample Print] button on the [MACHINE] screen is dimmed when the machine currently has no print job or stops printing.
The secondary (sub) tray for sample prints is selected automatically. When currently printed paper is set to be printed to the same secondary (sub) tray, you may be able to set another secondary (sub) tray for Sample Print. Contact your service representative.
Position the original, then press the [COPY] tab on the screen to display the [COPY] screen.
Set the desired copy conditions, then press Start on the control panel.
To display the [MACHINE] screen, press [No] on the dialog.
When [Copy] is selected in [Default Screen Setting], press [Close] on the dialog to return to the [COPY] screen, then display the [MACHINE] screen.
Press [Execute Sample Print] on the [MACHINE] screen at the desired time to check the quality of the printed image.
A sheet of sample image is delivered to the secondary (sub) tray of the finishing option in use.

To stop the print due to the poor quality of sample image, press Stop on the control panel.
When [Copy] is selected in [Default Screen Setting], the print can be stopped by pressing Stop on the control panel after switching to the [MACHINE] screen.
For details about subsequent operations, refer to Stopping Job Currently in Process of Scanning/Printing.
