
Proof Copy: Outputting a Single Set to Check Setting Conditions
Use Proof Copy to scan the original and produce a single set or the first sheet of sample copy before making multiple copies. This is a convenient and cost effective way for making a large amount of copies.

You can select whether to output a set of all pages or to print only the first sheet by pressing Proof Copy on the control panel.
For details, refer to Common Setting: Setting the Various Operations of the Machine.
If original count exceeds the document feeder capacity of the ADF or the original glass is desired for scanning the original of multiple pages, use Separate Scan mode to start the operation by scanning all the original pages.
The proof-copied job can be stored as a hold job without being printed.
Position the original.
Open the [COPY] screen to specify any copy conditions.
If Separate Scan mode is selected, press Start on the control panel to scan all the original before proceeding to step 3.
Press Proof Copy on the control panel.
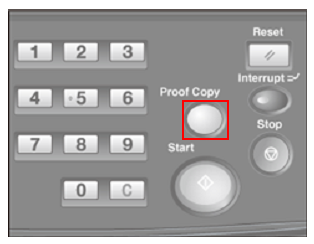
A set or the first sheet of sample copy will be output while scanning the original.
When using the Separate Scan mode and the original has already been scanned, the machine outputs a sample copy immediately.
Press the [MACHINE] tab.
The [Job Ticket Edit] screen is displayed. Check the contents.
Depending on the selected output settings or application functions, scroll keys appear at the bottom of each area. Press the keys to check all the settings.

If no setting change is desired, proceed to step 7.
Change the settings as required.
Make another sample copy as required.
Press [Proof] on the [Job Ticket Edit] screen to output a sample set. Pressing [Proof (1st)], if displayed, will output only the first sheet of the whole set.
The checked job can be stored as a hold job. Pressing [Hold] returns to the [MACHINE] screen without outputting data.
The held job can be output on the [JOB LIST] screen. For details, refer to Hold Job and Save on HDD.
Press [Close].
This returns to the [MACHINE] screen.
To cancel the output of proof-copied job, press Stop on the control panel, and then press [Cancel Job] on the dialog. All the image data will be cleared.
Press Start on the control panel.
The machine will start batch printing.