
Adding a Printer by Selecting a Connection Method
The printer can be connected with Bonjour, LPR (LPD), or IPP.
After configuring the network setting for this machine, select this machine as the printer to be used in the [Printers & Scanners] window ([Print & Scan] window in Mac OS 10.8) to enable printing.
Before establishing a Bonjour, LPD, or IPP connection, you must configure the network settings for this machine.
Items to be configured | Description |
|---|---|
IP Address | In [TCP/IP Settings] of this machine, specify the IP address. |
Bonjour Setting | Bonjour connection: Enable Bonjour in [Bonjour Setting] for this machine, and then enter the Bonjour name. |
LPD Setting | LPD connection: In [LPD Setting] of this machine, enable LPD printing. |
IPP Settings | IPP connection: In [HTTP Server Settings] for the machine, enable IPP printing. |
Configuring the Bonjour settings
Enable Bonjour in [Bonjour Setting] for this machine, and then enter the Bonjour name.

[Bonjour Setting] on this machine can be viewed by selecting Utility/Counter - [Administrator Setting] - [Network Setting] - [NIC Setting] - [Bonjour Setting] on the control panel.
Adding a printer
Click the Apple mark, and then select [System Preferences] from the [Apple Menu].
Click the [Printers & Scanners] icon.
Click [+].
When the menu is displayed, click [Add (Other) Printer or Scanner].
Click [Default].
Connected printers are detected.
If no printer is detected, turn this machine off, then on again.
In this case, turn off this machine, and then wait approximately 10 seconds before turning it on again. If you turn this machine on immediately after turning it off, it may not function correctly.
From the [Printer Name] list, select the desired Bonjour-connected model name.
The printer driver corresponding to the selected printer name is automatically selected.
To check the printer name, select [Administrator Setting] - [Network Setting] - [NIC Settings] - [Bonjour Setting] of this machine. In the default setting, the contents enclosed in parentheses ( ) suffixed in [Bonjour Name] correspond to the low-order three bytes of the MAC address. The following window shows an example where the printer name is changed to ''Printer Name''.
After the printer driver is selected, go to Step 7.
If an incorrect printer driver is selected, go to Step 6.

Select the desired printer driver manually. Select [Select (Printer) Software] from [Use(Print Using)], and then select the printer driver of the desired model name from the list that is displayed in the separate window.
Click [Add].
When the selected printer is registered in the [Printers & Scanners], the setting procedure is completed.
Configuring the LPR settings
Specify the IP address for this machine.
To use LPR printing in [LPD Setting] for the machine, enable LPD printing.
To check the IP address specified for this machine, open the [Utility] screen, and then select [Administrator Setting] - [Network Setting] - [NIC Settings] - [TCP/IP Settings].
To check [LPD Setting] of this machine, open the [Utility] screen, and then select [Administrator Setting] - [Network Setting] - [NIC Settings] - [Detail Settings]. To use LPD printing, set [LPD Setting] to [Enable].
Configuring [TCP/IP Setting] for the computer
Configure the TCP/IP settings on the Mac OS computer connected to the machine.
Click the Apple mark, and then select [System Preferences] from the [Apple Menu].
Click the [Network] icon.
The Ethernet setting window appears.
Select [Ethernet] and click [Details].
Click the [TCP/IP] tab.
Configure the settings including the IP address and subnet mask according to the settings of the network to which the Mac OS computer is connected.
Click the close button at the top left corner of the window. When the [Would you like to apply your changes before closing the Network preferences pane? ] message appears, click [Apply].
Adding a printer
Click the Apple mark, and then select [System Preferences] from the [Apple Menu].
Click the [Printers & Scanners] icon.
Click [+].
When the menu is displayed, click [Add (Other) Printer or Scanner].
Click [IP] or [IP Printer].
In [Protocol], select [Line Printer Daemon - LPD].
In [Address], enter the IP address for this machine.
The printer driver corresponding to this machine being identified with its IP address is automatically selected.
After the printer driver is selected, go to Step 8.
If an incorrect printer driver is selected, go to Step 7.

Select the desired printer driver manually. Select [Select (Printer) Software] from [Use(Print Using)], and then select the printer driver of the desired model name from the list that is displayed in the separate window.
Click [Add].
When the selected printer is registered in the [Printers & Scanners], the setting procedure is completed.
Configuring the IPP settings
Specify the IP address for this machine.
In [HTTP Server Settings] for the machine, enable IPP printing.
To check the IP address specified for this machine, open the [Utility] screen, and then select [Administrator Setting] - [Network Setting] - [NIC Settings] - [TCP/IP Settings].
To check [HTTP Server Settings] of this machine, open the [Utility] screen, and then select [Administrator Setting] - [Network Setting] - [NIC Settings] - [HTTP Server Settings]. To use IPP printing, set [IPP Setting] to [ON].
Configuring [TCP/IP Setting] for the computer
Configure the TCP/IP settings on the Mac OS computer connected to the machine.
Click the Apple mark, and then select [System Preferences] from the [Apple Menu].
Click the [Network] icon.
The Ethernet setting window appears.
Select [Ethernet] and click [Details].
Click the [TCP/IP] tab.
Configure the settings including the IP address and subnet mask according to the settings of the network to which the Mac OS computer is connected.
Click the close button at the top left corner of the window. When the [Would you like to apply your changes before closing the Network preferences pane? ] message appears, click [Apply].
Adding a printer
Click the Apple mark, and then select [System Preferences] from the [Apple Menu].
Click the [Printers & Scanners] icon.
Click [+].
When the menu is displayed, click [Add (Other) Printer or Scanner].
Click [IP] or [IP Printer].
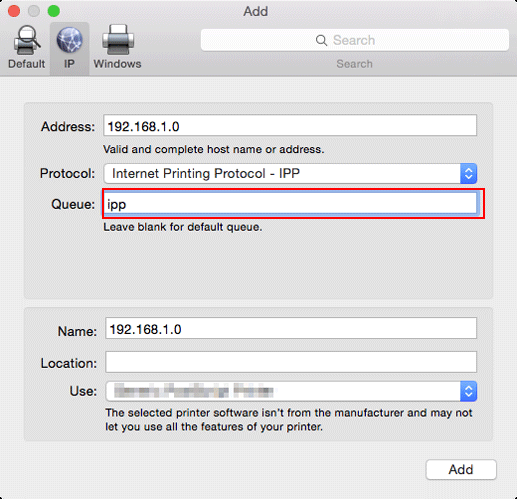
In [Protocol:], select [Internet Printing Protocol - IPP].
In [Address:], enter the IP address for this machine. In [Queue], enter "ipp".
The printer driver corresponding to this machine being identified with its IP address is automatically selected.
After the printer driver is selected, go to Step 8.
If an incorrect printer driver is selected, go to Step 7.
Select the desired printer driver manually. Select [Select (Printer) Software] from [Use(Print Using)], and then select the printer driver of the desired model name from the list that is displayed in the separate window.
Click [Add].
When the selected printer is registered in the [Printers & Scanners], the setting procedure is completed.