
Cover Trimming Adjustment: Adjusting the Trimming Width of the Right-Hand Cover Sheet
Adjust the trimming width of the right-hand cover paper determined by Perfect Binder PB-503.
Objects of Adjustment: Perfect Binder Tray, Except PB Tray

Make this adjustment after completing [Perfect Binder Adjustment] - [Cover Lead Edge Adj.].
Press [Adjustment] on the [MACHINE] screen to display the [Adjustment Menu] screen.
Press [Finisher Adjustment], [Perfect Binder Adjustment], and [Cover Trimming Adjustment] in sequence.

Load cover paper in either Perfect Binder Cover Tray or any other tray.
Load paper for body sets in the desired tray.
Select either [Perfect Binder Tray] or [Except PB Tray] for the tray loaded with covers.

Press [Print Mode].
Select the tray loaded with paper for body sets.
Press Start on the control panel.
A sample pattern of perfect-bound book is printed.
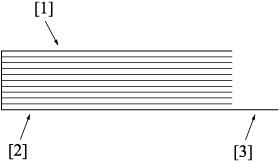
Check that the edge of the right cover paper is neatly aligned with that of the left cover paper.
[1] Left cover paper [2] Right cover paper [3] Trimming position
If any adjustment is required, press [Exit PrintMode] to return to the [Cover Trimming Adjustment] screen.
Use the touch panel keypad to enter the set value.
Use [+/-] to specify the value to be positive or negative.
Press [Set] to change the current value.
Adjustment Range: -128 ([To narrow]) to +127 ([To widen]) (1 step = 0.1 mm)
Repeat steps 6 to 11 until the desired result is obtained.
Press [Return].
The screen returns to the [Perfect Binder Adjustment Menu] screen.