
[Zoom]/[Image Shift] Adjustment
The magnification and printing position in vertical and horizontal directions can be finely adjusted on both Front side and Back side. Because the adjustment data can be entered directly in percentage terms or in numerical terms to shift, it is convenient for fine adjustment after [Scan Meas.] adjustment, [Gap] adjustment or [Chart Adjustment] or when you have a result of the 2-sided printing at hand.
The sample PDF file for adjustment is included in the [Users Guide CD] supplied with this machine.
Each page of the sample pdf document has register marks (+ marks) printed on the front and back sides.
Sample name: B_sample.pdf
Storage location: "/contents/sample/" in [Users Guide CD]

This section explains the Image Shift adjustment on the machine side, but this setting is also available via the printer driver for each job. For details, refer to Image Position.
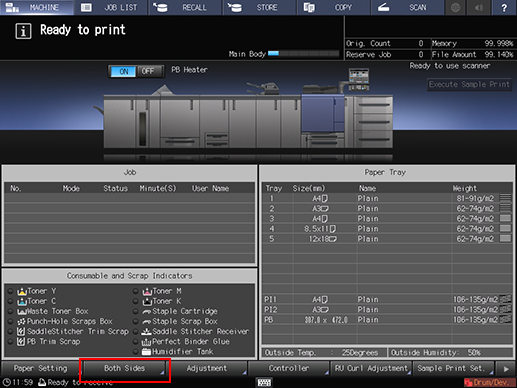
Press [Both Sides] on the [MACHINE] screen.
Select the tray in which the papers to be adjusted have been set.

Press [Front] or [Back] to specify the printing side to be adjusted.
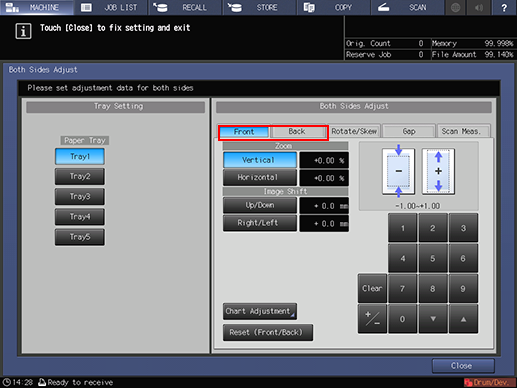
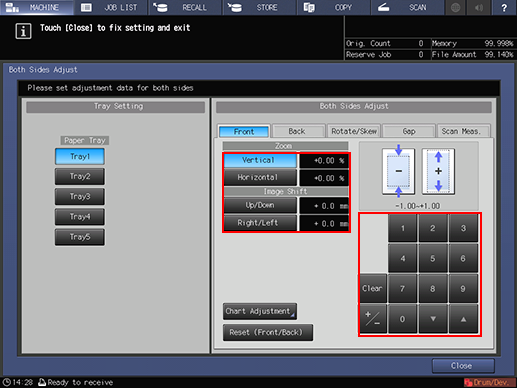
Use the touch panel keypad, [
 ], [
], [ ], or the keypad on the control panel to enter [Zoom].
For the adjustment of [Zoom], check it at the center of the page.
Press [Vertical] or [Horizontal] below [Zoom] and then enter a value. [Vertical] adjusts the magnification in the crosswise direction. [Horizontal] adjusts the magnification in the paper feed direction.
If [Back Side Magnification Adjustment] is set to [OFF], [Back] - [Horizontal] is not available.
To enlarge the printing side, enter a positive value, and to shrink it, enter a negative value.
Adjustment range: For both [Vertical] and [Horizontal], -1.00 to +1.00 ([Horizontal] on [Back] is -0.80 to +0.20) (1 step = 0.01%)
Use [+/-] to specify the value to be positive or negative.
Press [Clear] to reset the numeric value you are currently entering.
Pressing [Reset (Front/Back)] resets all the values you specified in [Front], [Back], or [Rotate/Skew].
Adjustment example of [Zoom]: When the image on the back side is vertically enlarged to 10.1 mm against the image of 10 mm on the front side, press [Vertical] on [Back], and then press in order of [1][0][0][+/-] to specify -1.00. The image on the back side is reduced by 1%. (The black
 in the figure indicates the front side and the blue indicates the back side.)

Use the touch panel keypad, [
], [], or the keypad on the control panel to enter the value of [Image Shift].For the adjustment of [Image Shift], check it at the center of the page.
Press [Up/Down] or [Right/Left] below [Image Shift], and then enter a value.
To move the printing side upward or rightward, enter a positive value, and to move downward or leftward, enter a negative value.
Adjustment range: For [Up/Down], -10.0 to +10.0; for [Right/Left], -3.0 to +3.0 (1 step = 0.1 mm)
The method of entering a value is the same as that of the step 4.
Adjustment example of [Image Shift]: When the image on the back side is misaligned downward by 0.5 mm and rightward by 0.3 mm against that of the front side, press [Up/Down] of [Back], and then press [5] to specify +0.5 mm. Then, press [Right/Left] and press in the order of [3] and [+/-] to specify -0.3 mm. The image on the back side is shifted to the top by 0.5 mm and the left by 0.3 mm. (The black
in the figure indicates the front side and the blue indicates the back side.)

Press [Close].
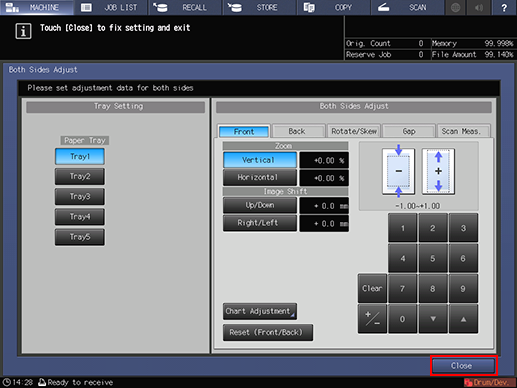
Now, the [Zoom]/[Image Shift] adjustment is completed.
After performing [Both Sides Adjust] several times, if the printing position is still misaligned between the front and back sides, readjust the reference position of the printing side. For details about how to adjust it, refer to Machine Adjustment.
You can register the adjusted value of [Both Sides Adjust] with the profile where paper conditions are set. With the paper setting registered, you can print documents in the same conditions as before, even after changing the tray to be set. For details about editing or registration of a profile, refer to Paper Profile: Setting and Registering the Paper in the Register/Delete Paper Setting Screen.