
Booklet: Copying as Booklet
Use this function to make a multiple page signature booklet printed on 2-sided paper, with original images automatically arranged in correct order.
Select either [Left Bind] or [Right Bind] according to the desired booklet type.
This function equally adjusts differences between the inside and outside margins of folding or binding paper, which occur when trimming folded or bound paper.
If the machine is equipped with Saddle Stitcher SD-506 or Saddle Stitcher SD-513, booklets folded in the center or folded and saddle-stitched booklets can be made, and trimming function is also available in combination.
The Finisher FS-532 mounted with the Saddle Stitcher SD-510 allows Half-Hold or Fold & Staple.
When [No Cover] and [Left Bind] are selected in [Cover Sheet], the original copy is printed as shown below.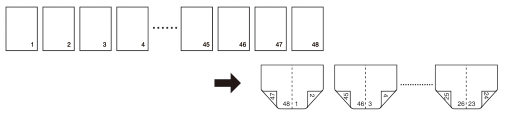
When [No Cover] and [Right Bind] are selected in [Cover Sheet], the original copy is printed as shown below.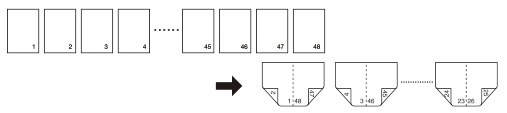
Use ADF. Use Separate Scan mode if the number of original pages exceeds the limit of the document feeder capacity of the ADF or if the original glass is required for scanning the original.
Original pages should be a multiple of 4 in [1->2] mode or a multiple of 2 in [2->2] mode. Otherwise, blank pages are automatically inserted to the last.
Select a body set from the [Paper] list on the [COPY] screen. The longer side of the selected paper is divided into two parts to be printed. The [Automatic Image Rotation] functions as needed. Also, [Auto Zoom] is automatically selected.
To add a cover to a booklet, load cover paper of the same size as for the body set into any paper tray or post inserter tray.
When [1 to N] is selected in [Output Setting ], paper in the specified paper tray is output in the following order.
[Post Inserter Paper] in [Front Cover] - [Tray Paper] in [Front Cover] - Body Set Tray Paper - [Tray Paper] in [Back Cover] - [Post Inserter Paper] in [Back Cover]
When [N to 1] is selected in [Output Setting], the output order above is reversed.When [Front Cover] - [Tray Paper] - [With Cover(Print)] is selected simultaneously with [Back Cover] - [Tray Paper] - [With Cover(Print)], [Front Cover] - [Tray Paper] has priority.
Select either [Left Bind] or [Right Bind] according to the desired booklet type. The page order is reversed between [Left Bind] and [Right Bind]. The table above shows [Left Bind].
[Creep Adjustment] is a function to equally adjust differences between the inside and outside margins of folding or binding paper, which occur when trimming folded or bound paper. Select the following two options for the creep adjustment setting.
[Whole Offset]: Specify the offset amount based on the total number of pages.
[Page Offset]: Offset the specified amount for each page.When using cover paper different from paper for the body sets, load the same size as the body sets into another tray. Post inserter of Folding Unit FD-503 cannot be used for feeding covers and body sets.
[Auto Zoom] is automatically selected.
Position the original.
For page order of the original, refer to the description above.
Load the desired copy paper size in a tray.
When selecting the cover sheet mode, load cover sheets of the same size as the body sets.
Use the Main Body Trays, Paper Feeder Unit PF-602m, Paper Feeder Unit PF-707, Paper Feed Unit PF-707m, Multi Bypass Tray MB-506, Large Capacity Unit LU-202m, Large Capacity Unit LU-202XL, or Post Inserter PI-502 to load cover sheets for booklets.
Set the tray for body sets and cover.
Press [Application] on the [COPY] screen.
Press [Booklet] on the [Application] screen.
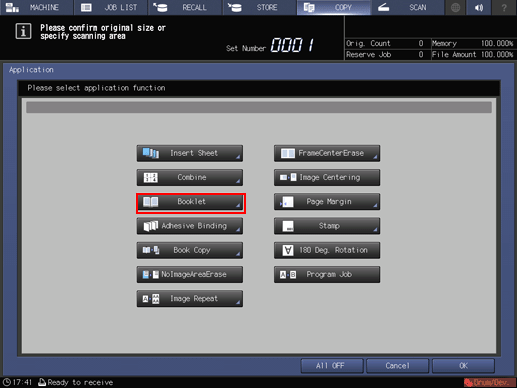
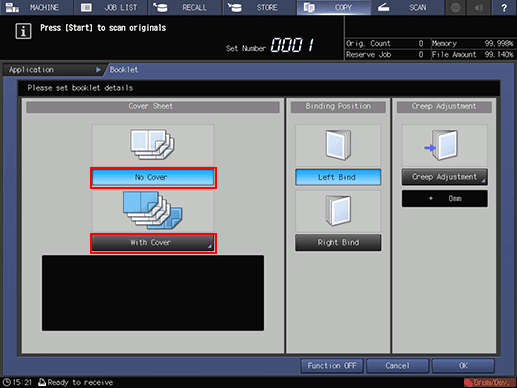
The [Booklet] screen is displayed.
When not adding a cover sheet, select [No Cover], then proceed to step 10. When adding a cover sheet, select [With Cover], then proceed to step 7.
Set the paper loaded in the paper tray as a cover sheet.
When there is an original to be copied on the front cover, select [With Cover(Print)] under [Front Cover]. When there is a blank original on the front cover, select [With Cover (Blank)] under [Front Cover], then select the paper tray in which a cover sheet has been loaded in step 2. If there is no original page for the front cover, select [None].
When there is an original to be copied on the back cover, select [With Cover(Print)] under [Back Cover]. When there is a blank original on the back cover, select [With Cover (Blank)] under [Front Cover], then select the paper tray in which a cover sheet has been loaded in step 2. If there is no original page for the back cover, select [None].

Set the paper loaded in Post Inserter PI-502 as the cover sheet.
To add a cover sheet before the cover sheet specified in step 7, select [PI1] or [PI2] under [Post Inserter Paper] of [Front Cover].
To add a cover sheet after the cover sheet specified in step 7, select [PI1] or [PI2] under [Post Inserter Paper] of [Back Cover].

When [None] is selected in step 7, the same result is obtained even if either option is selected.
When [PI1] or [PI2] is selected, [Quantity] is available. Display the [PI Paper Quantity] screen, then use the keypad on the screen or press the [
 ] or [
 ] key to enter the number of cover sheets. You can enter 1 to 40 sheets. Press [OK].

Press [OK] on the [With Cover] screen to return to the [Booklet] screen.
Press the desired binding position key.
Press [Left Bind] or [Right Bind] if you want to change the output order.

Perform Creep Adjustment.
Display the [Creep Adjustment] screen, and then select [Whole Offset] or [Page Offset]. Then, use the keypad on the screen or press the [
] or [] key to enter the offset amount. Press [OK].

Press [OK] to complete the setting.
To resume the original settings, press [Cancel].
To cancel the Booklet function with the current setting saved, press [Function OFF].
Press [OK] on the [Application] screen to return to the [COPY] screen.
The [Booklet] icon and shortcut key are displayed under [Application] on the [COPY] screen.
Select the tray loaded with paper for the body sets in step 2.
The paper tray for the body sets is automatically selected as default. If you also select [With Cover] in step 6, the two tray keys are selected. To change the tray for cover, refer to step 7.

Select Simplex/Duplex.
Select [1->2] or [2->2] according to the original type placed in the ADF in step 1.
Select any other copy conditions, as desired.
The Finisher FS-532 mounted with the Saddle Stitcher SD-510 allows Half-Hold or Fold & Staple. For details, refer to Using Finisher FS-532.
Page Space: When making half-folded or folded and stapled, and fore-edge-trimmed booklets, the space from the trimmed edge to the printed image may gradually widen from the inner pages to the outer pages. In this case, use the Page Space function in Page Margin in combination. For details, refer to Page Margin: Adjusting Position of Copy Image.
Using Set Numbering or Page No. of Stamp in combination, the machine can be set to print numbers on the outside edges (right side of right image, left side of left image) of copies. For details, refer to Stamp: Copying with Additional Information Printed.
Enter the desired print quantity from the keypad on the control panel.
Press Start on the control panel.
Printing does not start without returning to the [COPY] screen. Be sure to display the [COPY] screen.