
Annotation: Printing Text, Date/Time, Annotation Number onto Copy Paper
This function allows you to recall a predefined combination of text, date/time to load the original, and annotation number of the original and to print them onto output copies at the designated location. The annotation number can be changed temporarily on the Annotation screen after recalling the predefined setting ([Temp.No.Set]).
[Annotation] can be combined with other stamp functions.
Original | Output |
|---|---|
|
|


Setting | Output |
|---|---|
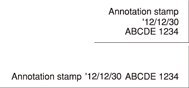
Example
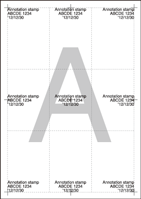
Printing Position
|
|


The administrator can change the order of text, date/time, and annotation number and whether to print/hide those in UTILITY. For details, refer to Annotation Setting: Set an annotation.

Up to 40 combinations of text, date/time, and annotation number can be registered.
The date/time is determined when the machine starts scanning originals, and is printed according to the setting on the machine.
The annotation number is counted for each scanned original in scanning order. The count will continue to the next job even if the machine power is turned off then on. However, the serial count is suspended if this function is not selected or [Temp.No.Set] is specified.
Printing position can be selected from 9 options. The fine adjustment is available up to 50 mm both in lengthwise and widthwise directions.
Position the original.
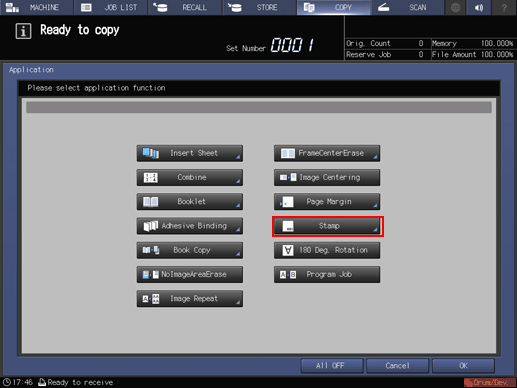
Press [Application] on the [COPY] screen.
Press [Stamp] on the [Application] screen.
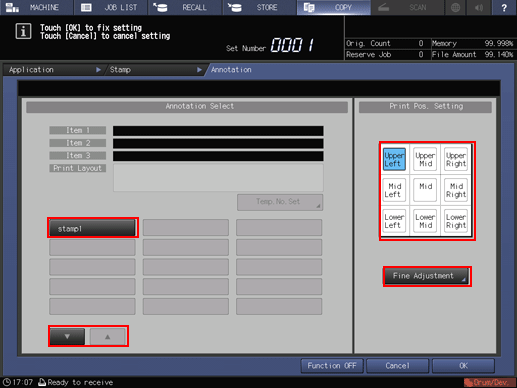
Press [Annotation].

Select the desired Annotation type, then specify its printing position.
Use [
 ] or [
 ] to display and select a button to recall the desired setting. The annotation setting registered on that button is displayed on the screen.
Select one of the 9 printing positions provided under [Print Pos. Setting]. When fine adjustment is desired, press [Fine Adjustment].
For details about fine adjustment of the printing position, refer to Detailed Setting in Stamp.
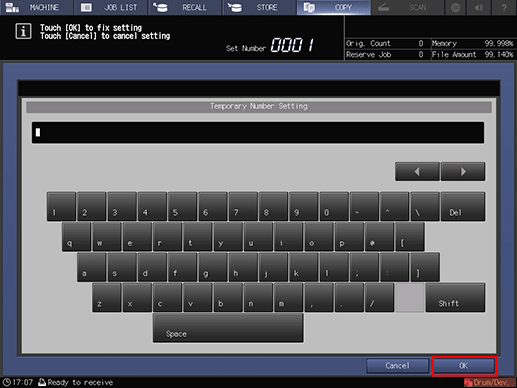
To change the annotation number temporarily, press [Temp.No.Set].
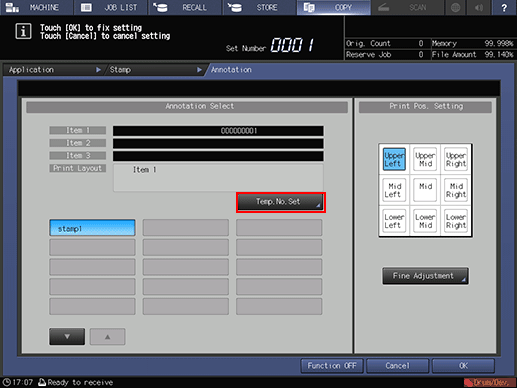
If the annotation number is not set to the button to recall the desired setting that you selected in step 5, [Temp.No.Set] is dimmed and cannot be selected.
Press the screen keys to enter a desired number for the temporary number. Up to 12 one-byte characters can be entered. With this setting specified, the annotation number will not be counted in the former setting. The entered temporary number will be printed on all pages.
If you enter [Temp.No.Set], [Temp.No.Set] is changed to [Temp.No.CLR]. Pressing [Temp.No.CLR] clears the temporary number.
Press [OK] to return to the [Annotation] screen.
Press [OK] twice to complete the setting.

The screen returns to the [Application] screen.
To resume the previous settings, press [Cancel].
To disable the function while keeping the current setting, press [Function OFF].
Press [OK] on the [Application] screen to return to the [COPY] screen.
The [Stamp] icon and shortcut key are displayed under [Application] on the [COPY] screen.
Select additional copy conditions, as desired.
Enter the desired print quantity from the keypad on the control panel.
Press Start on the control panel.