
Adjusting the tone curve
You can adjust each color's overall brightness and contrast by changing the tone curve of each CMYK or the tone curve of CMYK package to the image data in the hold job. You can also adjust the tone curve of each tag (image or text/graphics).

[Execute Each Tag Adj.] needs to be set to the tone curve setting for each tag in order to adjust the tone curve.

Tone curve for each tag setting can be set on [Administrator Setting] - [System Setting] - [Expert Adjustment] - [Quality Adjustment] - [Tone Curve Each Tag Setting]. For details, refer to Tone Curve Each Tag Setting: Enabling Tag-specific Tone Curve Adjustment.
If you connect the mouse to this machine, the tone curve can be adjusted by dragging the mouse. For details, refer to Using a Mouse.
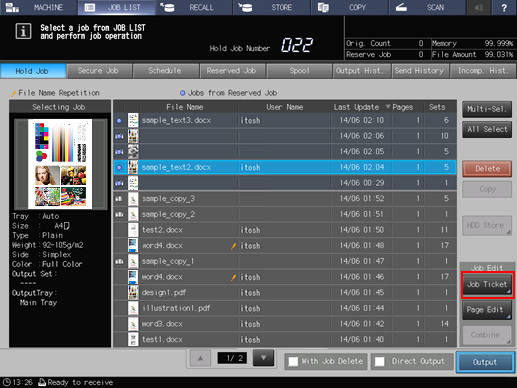
Press the [JOB LIST] tab to display the [JOB LIST] screen.
Press [Hold Job].
The [Hold Job] screen will be displayed.
Select the image file to adjust the tone curve on the [Hold Job] screen or [Secure Job] screen.
Press [Job Ticket].
Press [Tone Curve Adj.] in [Quality Adjustment].
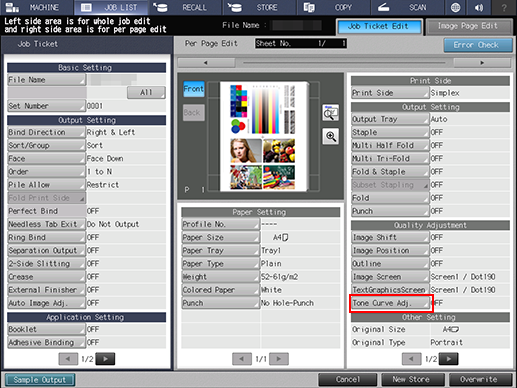
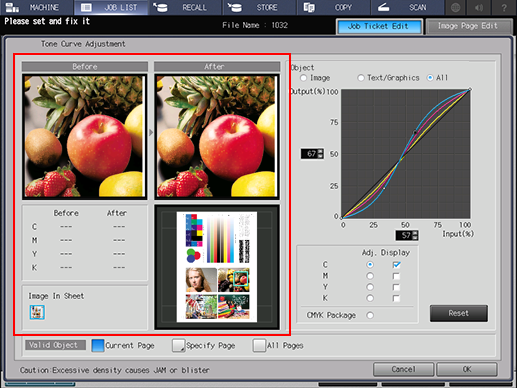
A Tone Curve Adjustment dialog is displayed.
Select the tag of the object to be adjusted.
Press either [Image], [Text/Graphics] or [All] from Object on the top right of the screen.
When [Do Not Execute Adjustment] is selected for tone curve for each tag setting, this setting is not displayed.
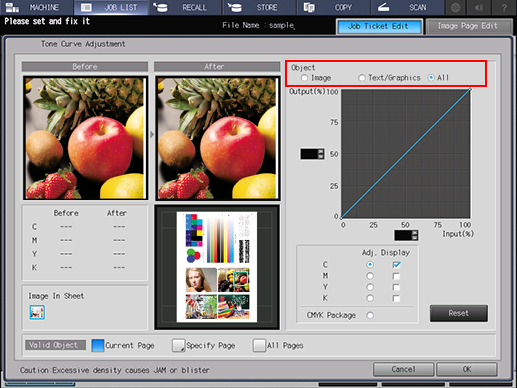
Select the color of the object to be adjusted.
Press the radio button of the color to be adjusted (C/M/Y/K). The [Display] check box is selected and the tone curve of the color is displayed.
Press the radio button for [CMYK Package] to adjust CMYK as a package. The confirmation dialog box is displayed, asking you to confirm that if you want to reset each color's tone curve. To adjust all, press [Yes] or press [No] to cancel.
The tone curve of the color selected by the [Display] checkbox is displayed. More than one color's tone curve can be displayed a time.

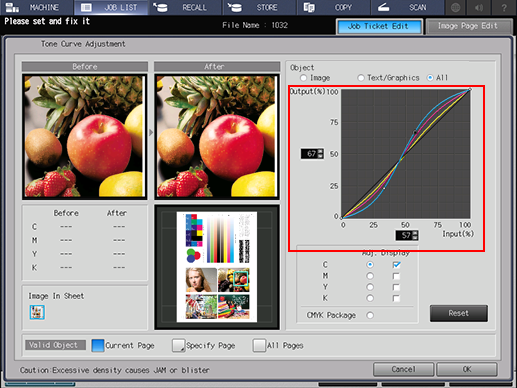
Adjust the tone curve.
The adjustment point (a black circle) is created by pressing the desired point on the tone curve.
The position of the adjustment point (a black circle) can be adjusted by changing the value of tone curve input (%) and output (%) with pressing [
 ][
][ ] or [
 ][
][ ].
].
Up to 17 adjustment points can be created (including input 0 % and 100%). The adjustment point selected on the tone curve is for the adjustment and displayed as a black circle. Other adjustment points are displayed as a white circle.
To undo the adjusted tone curve, press [Reset].
When the mouse is connected to this machine, the tone curve can be adjusted by dragging the adjustment point (a black circle). For details, refer to Using a Mouse.
Confirm the image of before and after adjustment on the preview display.
The thumbnail of the whole page is displayed on the lower right of the preview area.
The selected area on the thumbnail is surrounded with a green frame, and it is enlarged in [Before] and [After] on the top of the preview area.
Pressing the preview image in [Before] or [After] displays the CMYK value of before and after adjustment of the selected pixel on the lower left of the preview area.
For the combined image page data, such as 2 in 1, each combined image is displayed under the Image In Sheet on the lower left of the screen. The image selected here is displayed.
When the mouse is connected to the machine, click on the preview image in [Before] or [After] and then the CMYK value of the corresponding point is displayed as a black circle on the tone curve. It is useful when you want to change the specific density on the preview image.
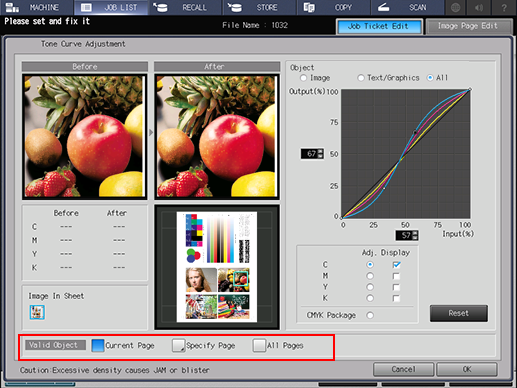
Select where you want to apply the adjusted tone curve.
Select either [Current Page], [Specify Page] or [All Pages] button from [Valid Object].
When you press [Specify Page], the Specify Page dialog is displayed. Enter the page number with either the keypad on the screen or the keypad on the control panel. When specifying the pages, delimit the page with [,]. When specifying the range, use [-]. Press [OK] to return to the Tone Curve Adjustment dialog.
Press [OK].