
Shortcut Key Register: Registering the Customized Operation
Select the desired shortcut keys for the following settings to be displayed on the [COPY] screen, [SCAN] screen, and [STORE] screen in order to improve the operability.
Up to 4 shortcut keys can be displayed under [Application] on the [COPY] screen.
Up to 2 shortcut keys can be displayed under [Application], which can be reached from the [SCAN] screen - Scan Setting screen.
Up to 4 shortcut keys can be displayed under [Quality Adj.] on the [COPY] screen.
Up to 4 shortcut keys can be displayed under [Quality Adj.], which can be reached from the [SCAN] screen - Scan Setting screen.
Up to 4 shortcut keys can be displayed under [Quality Adj.] on the [STORE] screen.
Select either shortcut keys or density settings to be displayed under [Quality Adj.] of the [COPY] screen, the Scan Setting screen accessible from the [SCAN] screen, and the [STORE] screen. When you select the density setting, the screen does not display the shortcut keys specified in [Quality Adj.] of the [COPY] screen and Scan Setting screen accessible from the [SCAN] screen and [STORE] screen.
Up to 4 shortcut keys can be displayed under [Output Setting] on the [COPY] screen.
Display up to six Copy Mode Memory shortcut keys under the [COPY] screen.
Display up to six Scan Mode Memory shortcut keys under the [SCAN] screen.
Display up to six Store Mode Memory shortcut keys under the [STORE] screen.
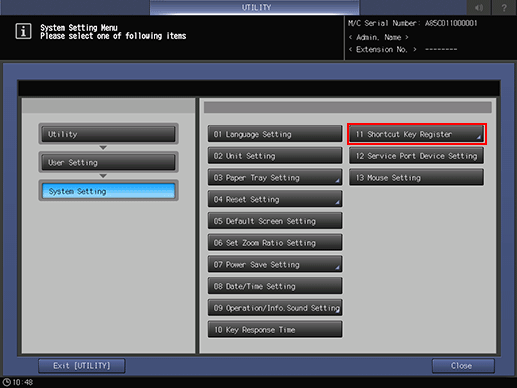
Follow the procedure on User Setting to display the [User Setting Menu] screen.
Press [System Setting] on the [User Setting Menu] screen, and then press [Shortcut Key Register].
To display the shortcut keys under [Application] on the [COPY] screen, press [Application (Copy)] to display the [Shortcut Key Register] screen.
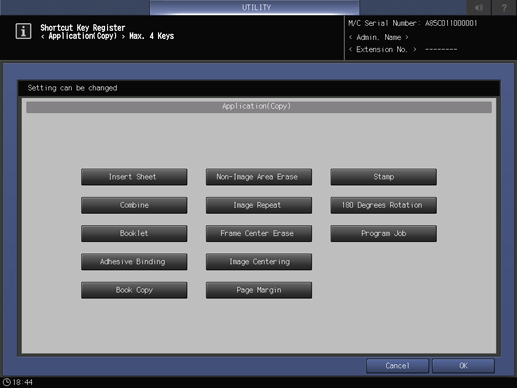
Select the desired application function buttons. Up to 4 keys can be selected.
Press [OK] to complete the setting.
The screen returns to the [Shortcut Key Register] screen.
To cancel the change, press Cancel. In either case, the screen returns to the [Shortcut Key Register] screen.
[SCAN] Screen - To display the shortcut keys under [Application] of the Scan Setting screen, press [Application (Scan)] to display the [Shortcut Key Register] screen.
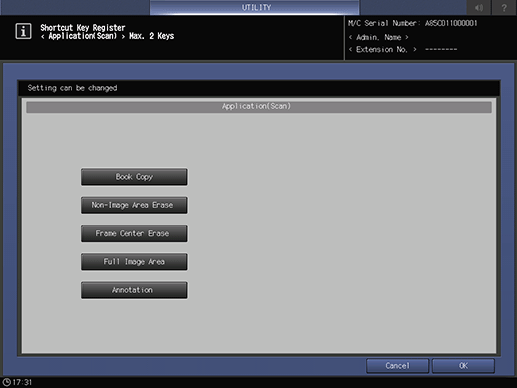
Select the desired application function buttons. Up to 2 keys can be selected.
Press [OK] to complete the setting.
The screen returns to the [Shortcut Key Register] screen.
To cancel the change, press Cancel. In either case, the screen returns to the [Shortcut Key Register] screen.
To display the shortcut keys under [Quality Adj.] on the [COPY] screen, press [Quality Adj.(Copy)] to display the [Shortcut Key Register] screen.
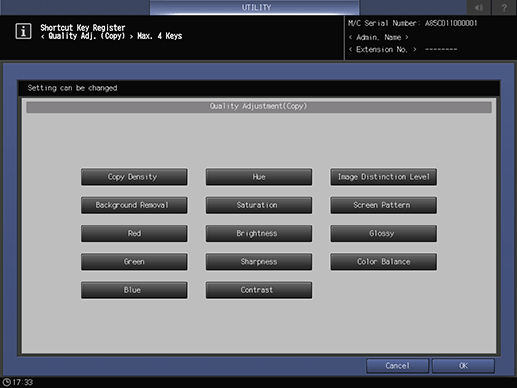
Select the desired quality adjustment function buttons. Up to 4 keys can be selected.
Press [OK] to complete the setting.
To cancel the change, press [Cancel]. In either case, the screen returns to the [Shortcut Key Register] screen.
To display the shortcut keys under [Quality Adj.] on the Scan Setting screen accessible from the [SCAN] screen, press [Quality Adj.(Scan)] to display the [Shortcut Key Register] screen.
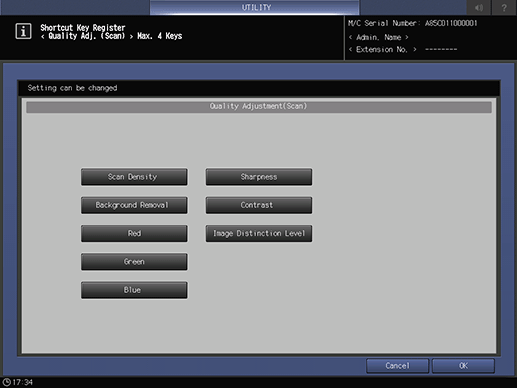
Select the desired quality adjustment function buttons. Up to 4 keys can be selected.
Press [OK] to complete the setting.
To cancel the change, press [Cancel]. In either case, the screen returns to the [Shortcut Key Register] screen.
To display the shortcut keys under [Quality Adj.] on the [STORE] screen, press [Quality Adj.(Store)] to display the [Shortcut Key Register] screen.

Select the desired quality adjustment function buttons. Up to 4 keys can be selected.
Press [OK] to complete the setting.
The screen returns to the [Shortcut Key Register] screen.
To cancel the change, press Cancel. In either case, the screen returns to the [Shortcut Key Register] screen.
[COPY] Screen, [SCAN] Screen - To select whether to display shortcut keys or density setting under the Scan Setting screen or under the [Quality Adj.] of the [STORE] screen, press [Quality Adj. Area Setting] to display the [Quality Adjustment Area Setting] screen.

Select either [Shortcut Display] or [Density Setting Display].
Press [OK] to complete the setting.
To cancel the change, press [Cancel]. In either case, the screen returns to the [Shortcut Key Register] screen.
To display the shortcut keys under [Output Setting] on the [COPY] screen, press [Output Setting] to display the [Shortcut Key Register] screen.
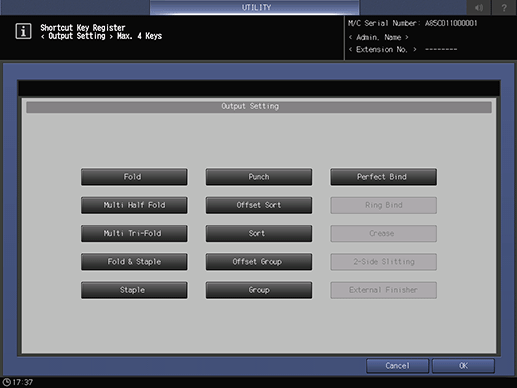
Select the desired output setting function buttons. Up to 4 keys can be selected.
To cancel the change, press [Cancel]. In either case, the screen returns to the [Shortcut Key Register] screen.
To display the Copy Mode Memory shortcut keys under the [COPY] screen, press [Copy Mode Memory] to display the registration screen.

Press the target Copy Mode Memory key. Six Copy Mode Memory keys can be assigned to [F1] to [F6].
Press [OK] to complete the setting.
To cancel the change, press [Cancel]. In either case, the screen returns to the [Shortcut Key Register] screen.
To display the Copy Mode Memory shortcut keys under the [SCAN] screen, press [Scan Mode Memory] to display the registration screen.

Press the target Scan Mode Memory key. Six Scan Mode Memory keys can be assigned to [F1] to [F6].
Press [OK] to complete the setting.
To cancel the change, press [Cancel]. In either case, the screen returns to the [Shortcut Key Register] screen.
To display the Store Mode Memory shortcut keys under the [STORE] screen, press [Store Mode Memory] to display the registration screen.
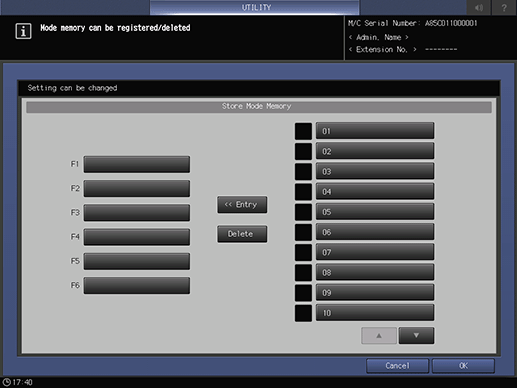
Press the target Store Mode Memory key. Six Store Mode Memory keys can be assigned to [F1] to [F6].
Press [OK] to complete the setting.
To cancel the change, press [Cancel]. In either case, the screen returns to the [Shortcut Key Register] screen.