
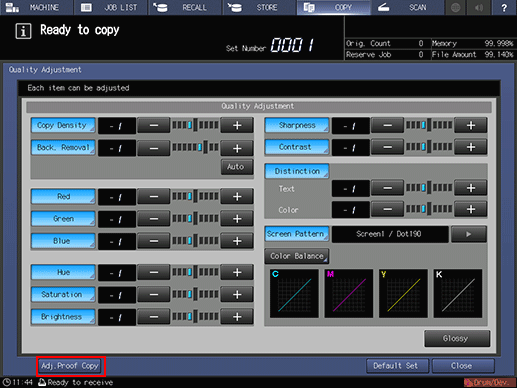
Overview of Quality Adjustment
Image quality can be adjusted to match the level of output images desired.
The following items can be set.
[Copy Density]: Refer to Copy Density: Adjusting Copy Density.
[Back. Removal]: Refer to Back. Removal: Adjusting Background Whiteness.
[Red]: Refer to Adjusting Red/Green/Blue.
[Green]: Refer to Adjusting Red/Green/Blue.
[Blue]: Refer to Adjusting Red/Green/Blue.
[Hue]: Refer to Adjusting Hue.
[Saturation]: Refer to Saturation: Adjusting Vividness of Color.
[Brightness]: Refer to Brightness: Adjusting Brightness of Color.
[Sharpness]: Refer to Sharpness: Adjusting Image Outline.
[Contrast]: Refer to Contrast: Adjusting Difference between Bright Area and Dark Area of Image.
[Distinction]: Refer to Image Distinction: Adjusting Text and Photo Distinction Method.
[Screen Pattern]: Refer to Screen Pattern: Selecting Screen.
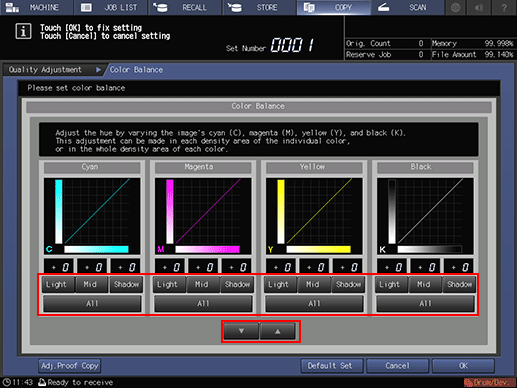
[Color Balance]: Refer to Color Balance: Adjusting Color Balance.
[Glossy]: Refer to Glossy Mode: Selecting Whether or not to Use Gloss.
To improve the copy image quality, select the desired item provided on the [Quality Adjustment] screen and make an adjustment as needed.
How to Set Quality Adjustment
Press the [COPY] tab to display the [COPY] screen.
Press [Quality Adj.] on the [COPY] screen.
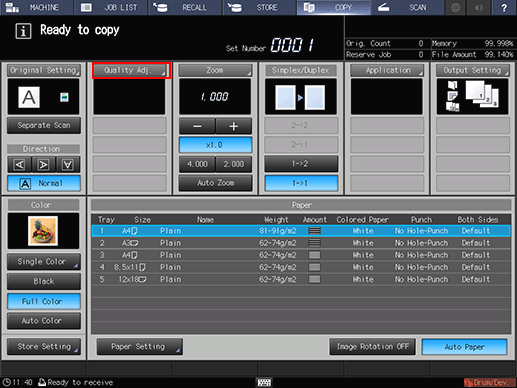
The [Quality Adjustment] screen is displayed.
Use [-] and [+] on the right side of the desired item key to make an adjustment. Or, press the item button to display the screen for adjustment only, then use the buttons from [-4] to [4] or from [-6] to [2] to make an adjustment.
To select the Glossy mode, press [Glossy].
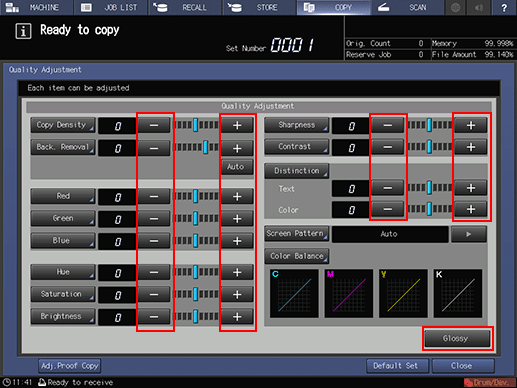
To change the selection of [Screen Pattern], press [
 ] on the right side to display the desired screen. Or, press [Screen Pattern] to display the [Screen Pattern] screen, then select the desired button.
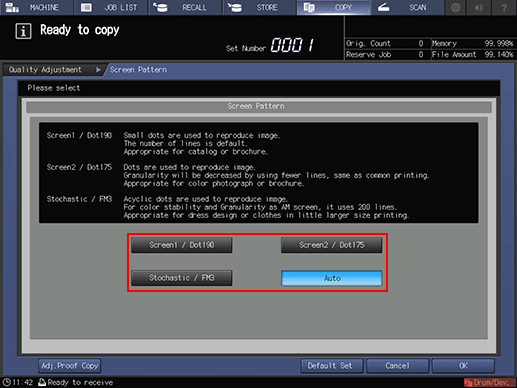
As for [Color Balance], press this button to display the [Color Balance] screen, then make the desired adjustment for each color of [Cyan], [Magenta], [Yellow], and [Black].
Position the original, then press [Adj. Proof Copy] on the screen or Proof Copy on the control panel to output a sample copy to check the result of adjustment you made on that screen, or the result of various adjustments used in combination.
Press [Close] on the [Quality Adjustment] screen to return to the [COPY] screen.