
Making Perfect-Bound Booklets
Check the current status of the heater of perfect binder.
The [MACHINE] screen allows you to check the current status of the heater of perfect binder. Normally, [PB Shut Off] is displayed on the screen.
With [Perfect Bind] selected on the [Output Setting] screen in step 8, the Perfect Binder Heater Switch is automatically turned [ON].
If you previously know the time to use the perfect binder, calculate the timing to turn on the heater with required warmup time, then press [ON] of PB heater switch.
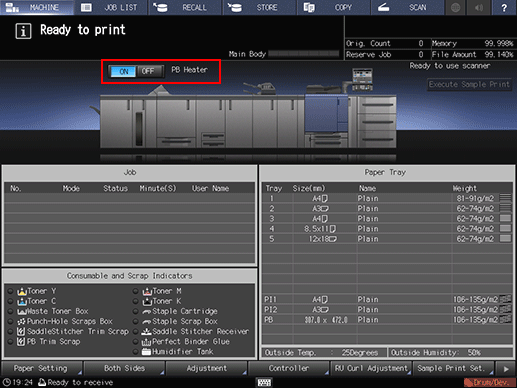
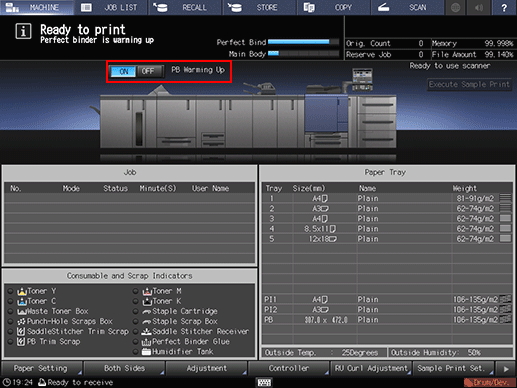
When the PB heater switch is turned [ON], the message [PB Shut Off] changes to [PB Warming Up], then to [PB Heater] when warmup is completed.
Position the original.
For details about the original available in perfect binding, refer to Finished Image of Perfect Binding.
Load paper for body sets in a tray.
The following trays are available for body sets:
Main Body Trays, Paper Feeder Unit PF-602m, Paper Feeder Unit PF-707, Paper Feed Unit PF-707m, Multi Bypass Tray MB-506, Large Capacity Unit LU-202m, Large Capacity Unit LU-202XL
Load paper for covers in a tray.
To copy on cover paper, use the main body trays, Paper Feeder Unit PF-602m, Paper Feeder Unit PF-707, Paper Feed Unit PF-707m, Multi Bypass Tray MB-506, Large Capacity Unit LU-202m, or Large Capacity Unit LU-202XL.
If cover printing is not required, use the following trays.
Cover tray of Perfect Binder PB-503
Upper tray/lower tray of Folding Unit FD-503 post inserter
Use custom paper size for cover. Entering length and width is required. Be sure to check precise dimensions of cover sheets to be used.
If cover trimming is desired, be sure to use the paper size that secures 5 mm to 40 mm of trimming width.
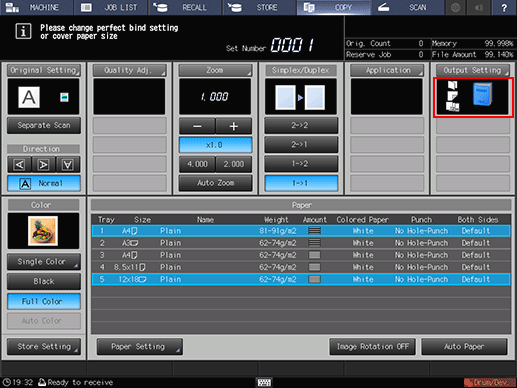
Press the [COPY] tab to display the [COPY] screen.
Select the tray loaded with paper for body set on the [COPY] screen.
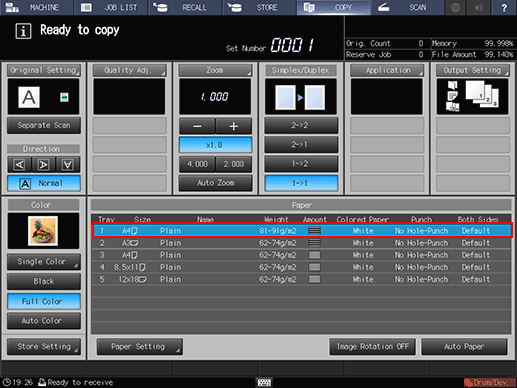
The paper size is detected automatically.
Change the paper setting, as required.
If the paper weight set for the selected tray is inadequate for body set, the binding operation cannot be performed.
Select one from [62-74 g/m2] / [16-19 lb Bond], [75-80 g/m2] / [20-21 lb Bond], [81-91 g/m2] / [22-24 lb Bond], and [92-105 g/m2] / [25-28 lb Bond].
The binding operation may not be performed even if one of the paper weight mentioned above is specified. The number of body set pages may be limited depending on the selected paper weight. For details, refer to Finished Image of Perfect Binding.
Press [Output Setting] and [Perfect Bind] in sequence.
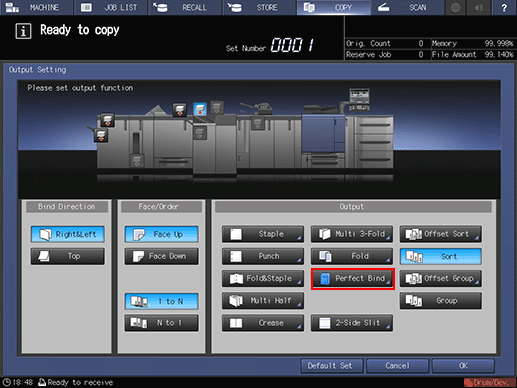
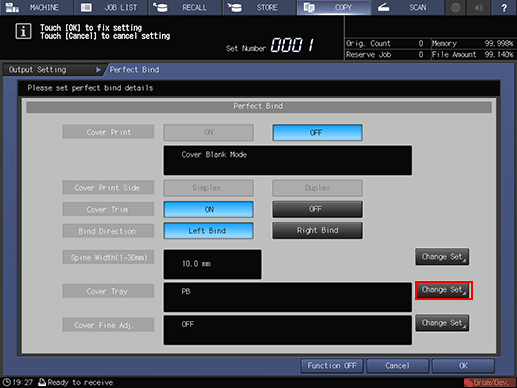
The [Perfect Bind] screen is displayed.
The heater of the perfect binder automatically starts warming up. The warmup takes approximately 20 minutes.

The warmup does not stop even if [Default Set] is pressed on the [Output Setting] screen or Reset is pressed on the control panel.
To stop using Perfect Binder PB-503, return to the [MACHINE] screen, then press [OFF] of Perfect Binder Heater Switch. When the perfect binder is not used, be sure to turn off the heater so as to prevent the degradation.
Press [Change Set] on the right side of [Cover Tray].
The [Cover Tray] screen is displayed.
Select the tray loaded with cover paper.
Press the tray key loaded with cover sheets in step 4.
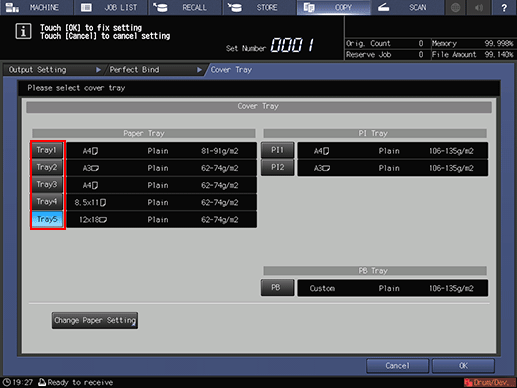
Selecting one from [Tray1] to [Tray5] or [Bypass] enables the covers to be printed.
Cover printing is unavailable if [PI1], [PI2], or [PB] is selected.
When Saddle Stitcher SD-513 is mounted on this machine while the cover tray of the perfect binder is not selected to load cover paper, the crease and 2-side slitting functions of the saddle stitcher can be used for the cover. For details, refer to Creasing Paper and 2-Side Slitting.
Press [Change Paper Setting].
The [Paper Setting] screen is displayed.
This paper setting step is not necessary if the tray selected in step 10 has already been set for the covers. Proceed to step 13.
Paper setting for covers is also available from the [MACHINE] screen or [COPY] screen. Perform the paper setting procedure after step 4, if desired.
Change the paper setting of the tray loaded with covers.
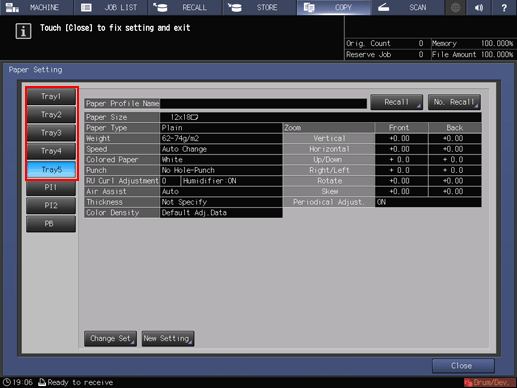
For details about the procedure of cover paper setting on the [Paper Setting] screen, refer to Paper Setting: Setting Paper for Tray.
Press [Close].
The screen returns to the [Cover Tray] screen.
Press [OK].
The screen returns to the [Perfect Bind] screen.
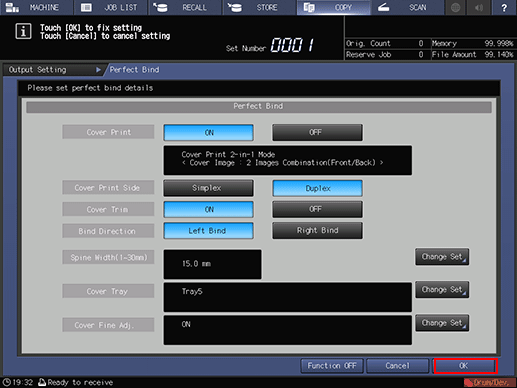
Make the cover print setting.
Select [ON] on the right side of [Cover Print], if cover printing is desired.

Selection of [ON] for [Cover Print] becomes available when a cover tray is selected from [Tray1] to [Tray5] or [Bypass] in step 10.
With [ON] for [Cover Print] selected, you may also select the [Cover Print Side], selecting [Simplex] for printing only on the front side, or [Duplex] to have both front and back sides printed.
The cover printing result varies depending on whether the original page count is odd or even. For details about finished result with each setting specified, refer to Finished Image of Perfect Binding.
When Saddle Stitcher SD-513 equipped with Creaser Unit CR-101 or Trimmer Unit TU-503 is mounted on this machine, [Previous] or [Next] is displayed in the lower-left side of the screen. For cover trimming, configure a setting in [(1) Cover Fore-edge Trim] and [(2) Cover 2-Side Slit] that are displayed when [Next] is pressed. For details, refer to steps 7 to 10.
Make the cover trimming setting.
Select [ON] or [OFF] from the right side of [Cover Trim].
If the trimming width estimated by the machine does not fall within the range from 5 mm to 40 mm, a message is displayed to inform you that the trimming mode is unavailable. In this case, adjust the cover or spine width to enable this setting.
If the estimated amount exceeds 10 mm, the machine automatically trims the cover whether this function is activated or not.
Select the bind direction.
Select [Left Bind] or [Right Bind] on the right side of [Bind Direction].
Specify the spine width.
To display the [Spine Width] screen, press [Change Set] on the right side of [Spine Width (1.0 mm - 30.0 mm)].
Use the touch panel keypad, [
 ], [
], [ ], or the keypad on the control panel to enter the desired value.
This setting is effective with Cover Print set to [ON].
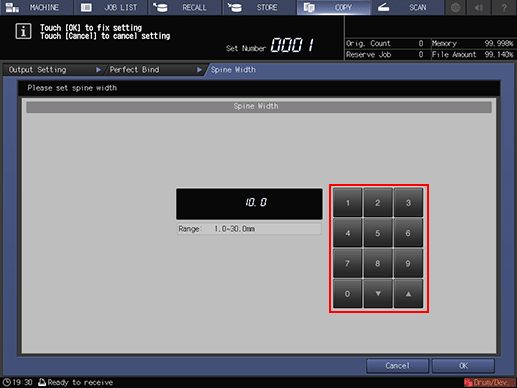
Press [OK].
Make fine adjustments in the lead edge, trimming width, and image position of the cover.
To display the [Cover Fine Adj.] screen, press [Change Set] on the right side of [Cover Fine Adj.].

To adjust the lead edge of the cover, press [Cover Lead Edge Adj.]. Use the touch panel keypad, [
], [], or the keypad on the control panel to enter the desired value, then press [+/-] to select positive or negative of the adjustment value.
To adjust the trimming width, press [Cover Trimming Adj.]. Use the touch panel keypad, [
], [], or the keypad on the control panel to enter the desired value, then press [+/-] to select positive or negative of the adjustment value.
To adjust the image position of the cover, press [Cover Image Shift Adj.]. Press [Front] or [Back] to select the print side, then [Up/Down] or [Right/Left] to select the direction to be adjusted. Use the touch panel keypad, [
], [], or the keypad on the control panel to enter the desired value, then press [+/-] to select positive or negative of the adjustment value.
Press [OK].
The screen returns to the [Perfect Bind] screen.
The screen shows the details of perfect binding settings currently made. Check the settings.
Press [OK] twice to return to the [COPY] screen.
The Perfect Binding icon is displayed under [Output Setting] on the [COPY] screen.
Select additional copy conditions, as desired.
When making 2-sided copies, select [1->2] or [2->2].
If the number of original pages exceeds the maximum stack capacity of the ADF, use Separate Scan mode.
Enter the desired print quantity from the keypad on the control panel.
It is recommended to output a single set before making multiple sets.
After a set is output, the actual thickness of body set is displayed on the [Perfect Bind] screen.
Use this information to adjust the spine width if it differs from the value specified before.
Press Start on the control panel.
Perfect Binder PB-503 does not operate while the heater of perfect binder is warming up. When warmup is completed, the machine operation starts automatically.
Never open the perfect binder front door while the machine operation is in process. Otherwise the machine immediately stops the operation and paper jam may be caused.