
Overview of [COPY] Screen
The [COPY] screen is displayed when you make a copy. This screen allows you to select the desired copy conditions, print, and reserve jobs.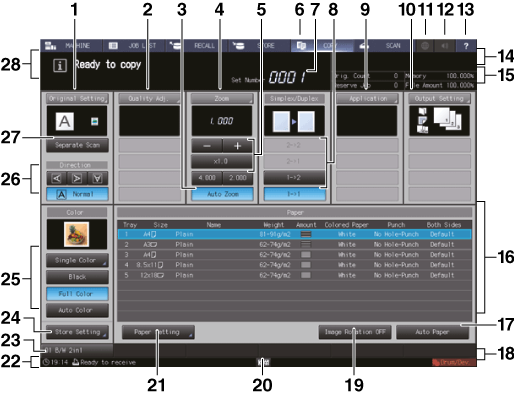
No. | Name | Description |
|---|---|---|
1 | [Original Setting] | Displays the [Original Setting] screen which allows you to set conditions of the original to be copied. [Direction] keys provided under the [Original Setting] screen can also be used to select the direction of the original. The following types of icons appear under [Original Setting]. |
2 | [Quality Adj.] | Displays the [Quality Adjustment] screen to adjust the quality of output images. A maximum of 3 manually specified quality adjustment items are displayed under [Quality Adj.]. A maximum of 4 shortcut keys for frequently used quality adjustment functions are displayed under [Quality Adj.]. When a mode other than [Auto] is selected in [Screen Pattern], the selected screen is displayed. The density setting can also be displayed in addition to shortcut keys. For details, refer to Shortcut Key Register: Registering the Customized Operation. |
3 | [Auto Zoom] | Highlighted when [Auto Zoom] is on. And pressed when using the Auto Zoom function. |
4 | [Zoom] | Displays the [Zoom] screen for setting [x1.0], [Auto Zoom], [Vert./Horiz. Zoom], [Enlarge], [Reduce], and [Set Zoom Ratio]. Keys below [Zoom] on the [COPY] screen can be used for specifying [Set Zoom Ratio], [x1.0], and [Auto Zoom]. |
5 | Zoom setting button | To set the [Vert./Horiz. Zoom] ratio, press [-][+]. To select the same magnification (100 %), press [x1.0]. To select [Set Zoom Ratio], press a button on which set zoom ratio is displayed. |
6 | [COPY] tab | Displays the [COPY] screen to perform copy operations. |
7 | Set Number indicator | Indicates the print quantity entered from the keypad on the control panel. |
8 | Simplex/Duplex | Selects the Simplex/Duplex copy mode. |
9 | [Application] | Displays the [Application] screen to select application functions. A maximum of 5 icons for set application functions are displayed under [Application]. Up to four specified application functions are displayed as shortcut keys. |
10 | [Output Setting] | Displays the [Output Setting] screen to select the [Bind Direction] and [Face/Order], and to set the [Output]. Set output settings are displayed as icons in the area under [Output Setting]. A maximum of 4 shortcut keys for frequently used output functions are displayed under [Output Setting]. |
11 | Web Browser | Displays the screen that corresponds to the URL specified on the Web browser. |
12 | Alarm Sound/Sound | Selects whether or not to ring all alarm sounds/sounds. |
13 | Help | Displays the help message which provides information on the screen currently displayed. Depending on the screen, the help key may be dimmed and cannot be selected. Press in the [MACHINE] screen to display instructions about how to replace toners, replace waste toner boxes, load paper, add staples, dispose scraps of staples, punches, and trims, supply glue pellets, and supply water to the humidifier tank. |
14 | Output information indicator | The upper part shows the print quantity of the current print job and set quantity. The lower part shows the job number of the current print job and a user name (when a user name is entered for user authentication) or a section name (when a section name is entered for section authentication). |
15 | Machine management information indicator | Displays original print count and the number of reserved jobs (unit: number), and the remaining amount of memory and the file system (unit: %). |
16 | Tray information indicator | Displays paper size, direction, paper name, paper weight, remaining amount of paper, paper color, punched/not punched, Both Sides Adjust set to Main Body Trays, Paper Feeder Unit PF-602m, Paper Feeder Unit PF-707, Paper Feed Unit PF-707m, Large Capacity Unit LU-202m, Large Capacity Unit LU-202XL, Multi Bypass Tray MB-506, Banner Tray Unit MK-740, or Output tray reinforcing unit for banner MK-740m. |
17 | [Auto Paper] | This key is highlighted when the [Auto Paper] function operates. And pressed when using the [Auto Paper] function. |
18 | Machine status indicator/right | Displays [Fuser (Env.)], [USB Drive], [Y-Toner], [M-Toner], [C-Toner], [K-Toner], [PM Call], [ADF Clean], [Consumable], [Un-Comp.], [Security], [Modem Err], [ORU-M], [Dark Tone]. Up to 4 indicators can be displayed in large size. When 5 or more indicators are displayed, small icons without texts will substitute for the indicators from the 4th and onward. The maximum number of items displayed is a total of 7, including 3 normal-sized icons and 4 small-sized icons. |
19 | [Image Rotation OFF] | Activates/Deactivates the Image Rotation function. |
20 | Soft-hard key icon | When using Real-time Remote Panel, hard keys of the control panel can be displayed on a computer screen and on the touch panel. Press any part of the black bar with this icon displayed. It does not function in other cases. When you move to another screen from the screen with hard keys displayed, the hard key display disappears. For details, refer to Remotely Controlling Machine (Remote Panel). |
21 | [Paper Setting] | Configure the paper setting of the main body trays, Paper Feeder Unit PF-602m, Paper Feeder Unit PF-707, Paper Feed Unit PF-707m, Multi Bypass Tray MB-506, Large Capacity Unit LU-202m, Large Capacity Unit LU-202XL, the upper tray / lower tray of Post Inserter PI-502, upper tray / lower tray of Post Inserter mounted on Folding Unit FD-503, or the cover tray of Perfect Binder PB-503, the tray of Banner Tray Unit MK-740, or the tray of Output tray reinforcing unit for banner MK-740m. |
22 | Machine status indicator/left | Displays the current time or the status of the image controller. |
23 | Shortcut key | Display up to 6 Copy Mode Memory shortcut keys. |
24 | [Store Setting] | Holds jobs to be copied or saves them on the HDD. |
25 | Color setting keys | Selects one for color mode from [Single Color], [Black], [Full Color], or [Auto Color]. |
26 | Direction keys | Selects the direction of the original placed on ADF or the original glass. |
27 | [Separate Scan] | Temporarily saves the scanned image information of originals to be copied in memory. This button is used for printing multiple originals that are scanned separately at one time. |
28 | Message area | Displays messages concerning the current status of the machine, prohibited matters at the time, or required operations. |