
Booklet: Imposing A4 Original on A4 Paper (Reduced Print / A5 Size Finishing)
Impose an A4-size PDF document with 32 pages on A4 papers (reduced size), and then finish with the booklet function.
In this section, you can check how to finish the printed document while actually operating with sample data (sample A).
•Example Introduced in This Section
Saddle Stitcher SD-506 is required (refer to Using Saddle Stitcher SD-506).
•Intended Environment
Operating system | Windows 7 |
Application | Adobe Acrobat XI Pro |
Printer driver | PS Plug-in Driver |
Image Controller | Image Controller IC-603 |
Mounted finisher | Saddle Stitcher SD-506 |
* The sample screen may be different from the actual display depending on your system environment and application version/revision.
•Samples
Sample A: A_sample.pdf
Provided in the "/contents/sample/" folder on the [User's Guide CD] supplied with this machine.
•Workflow
STEP 1: Setting printer driver
STEP 2: Checking the finishing
Check the finishing of the printed document, then make adjustments with reference to the link if needed.
•Recommended Combination
Stamp: You can insert Date/Time, Page Number and Copy Number in each page at the time of printing. ([Stamp] tab of the printer driver. Refer to Stamp.)
•Precautions
Prior to printing, make sure of the following when performing setting and operation.
Load the papers and configure the paper settings (refer to Paper Setting: Setting Paper for Tray / Paper Setting: Making Paper Settings / Paper Profile: Setting and Registering the Paper in the Change Individual Set Screen)
Pull out the paper output tray of the Saddle Stitcher (refer to Saddle Stitcher SD-506 or Saddle Stitcher SD-506.)

To reproduce stable colors, in addition to regular calibration, make other pre-output image quality adjustments as necessary, such as when changing screens or papers or when hue is important. For details, refer to Pre-output Image Quality Adjustment.
To adjust the image positions of front and back sides of printing, make pre-output image quality adjustments. For details, refer to Procedure of Both Sides Adjust.
If you cannot set this function, make sure that the optional device has been correctly mounted.
Match the original orientation and the orientation of the paper in the paper tray.
Setting printer driver
Set the following items in the printer driver.
Menu item
•Imposition (Booklet)
•Binding Position
•Original Size
•Original Orientation
•Paper Size
•Paper Tray
Also, set the following on the [Print] window of Application.
•Copy Count

When setting in the printer driver, make sure that there are no previous settings left in each item in the tabs [Layout], [Finishing], [Cover], etc.
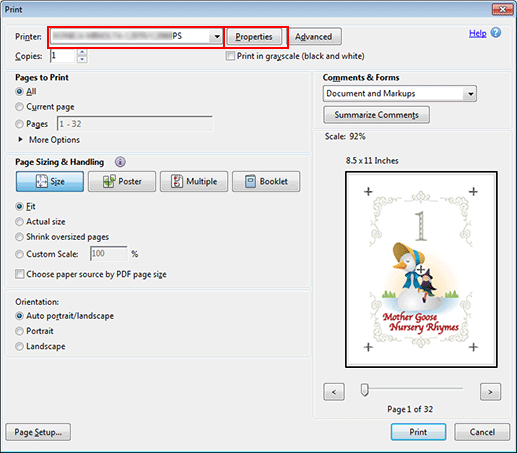
Open the original data with the application, and then click [Print] on the [File] menu.
Sample A (A_sample.pdf) is used in this example.
Select the printer to use for printing and click [Properties].
Click the [Layout] tab, and then set the following items.
Example:
Item
Setting
[Imposition]
[Booklet]
[Binding Position]
[Left Bind]
[Original Size]
[A4]
[Original Orientation]
[Portrait]
[Paper Size]
[A4]
If the specified settings on the preview is not displayed, click [Acquire Device Information] on the [Configure] tab to obtain the device information.

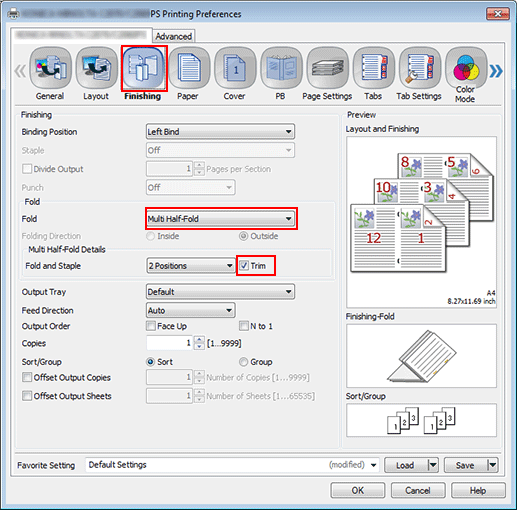
Click the [Finishing] tab, and then set [Fold] and [Multi Half-Fold Details].
Example:
Item
Setting
[Fold]
[Multi Half Fold]
[Multi Half-Fold Details] : [Trim]
Checked
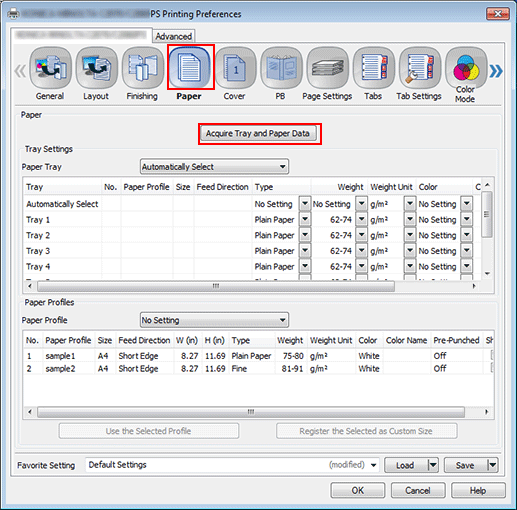
Click the [Paper] tab, and then click [Acquire Tray and Paper Data].
When the tray and paper data is acquired, a green checkmark
 is displayed.
If the tray and paper data could not be acquired, a red x checkmark
 is displayed. Check if the paper tray for Option is correctly mounted.
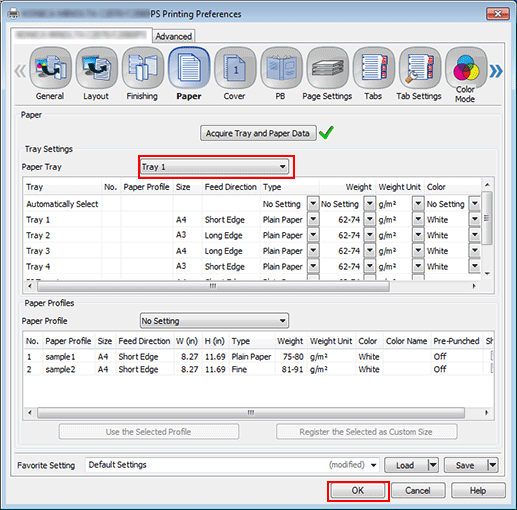
Select a tray in [Paper Tray], and then click [OK].
Example: Here, the explanation assumes that papers (A4: Short Edge) have been set in [Tray 1].
On the [Print] screen, enter the [Copies] and click [Print].
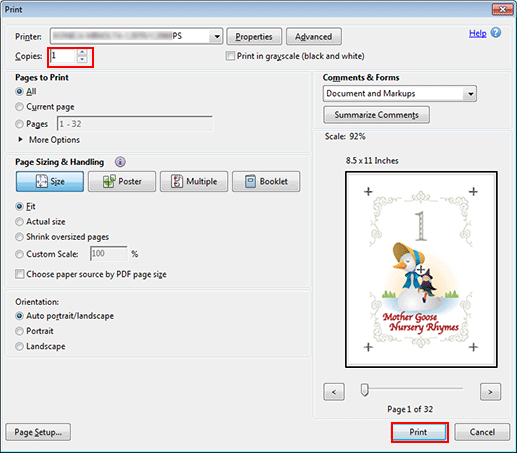
Printing starts. When the printing is completed, go to "Checking the finishing" and check the finishing of the printed document.

Checking the finishing
Check the finishing of the printed document. Check the following items, and then make adjustments if needed.
Check item | Check point | Adjustment method |
|---|---|---|
Finishing size / Paper type |
| - |
Alignment of the front side and back side (use the sample chart) 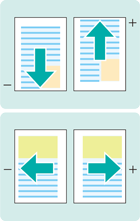 | Are the print positions of the front side and back side the same? -> Shifted either upward, downward, leftward or rightward: Image shift adjustment | |
Are the print positions of the front side and back side the same? -> The scale has been changed: Adjustment for the vertical magnification and horizontal magnification | Both Sides Adjust: Adjusting the Horizontal/Vertical Magnification | |
Check the half-fold position | Is the half-fold position displaced from the center of the paper? | |
Check the staple center positions | Are the staple positions displaced from the center of the paper? | |
Check the staple pitch | Is the interval of the staples reasonable? | |
Check the image quality | Are the image quality and colors stable without any fluctuation? -> The image quality and colors are unstable: Carry out the corrective operations In case of the following symptoms, carry out the corrective operations.
| |
Have the colors been reproduced just as expected? -> Far from what is expected | Image Quality: Using Spot Colors Image Quality: Registering an Alternative Color (RGB -> CMYK) Image Quality: Registering an Alternative Color (CMYK -> CMYK) |


