
IDC Sensor Adjustment
The printer gamma correction is periodically and automatically made on this machine. The automatic gamma correction uses an IDC sensor to scan the pattern. Should the IDC sensor be change in characteristics, the automatic gamma correction may not be performed properly. The IDC Sensor Adjustment allows you to correct the IDC sensor using the scanner, in order to make the gamma correction properly.
This section describes how to make adjustments when this machine is equipped with neither Integrated Color Care Unit IQ-501 nor Relay Unit RU-518.
Tips
Make this adjustment after completing the Gamma Automatic Adjustment.
Use plain paper or white paper for color printing in this adjustment. Using colored paper cannot make this adjustment properly, affecting the color of output test pattern.
To restore to the measured data of the ROM, press Reset Adj. Data to reset it.
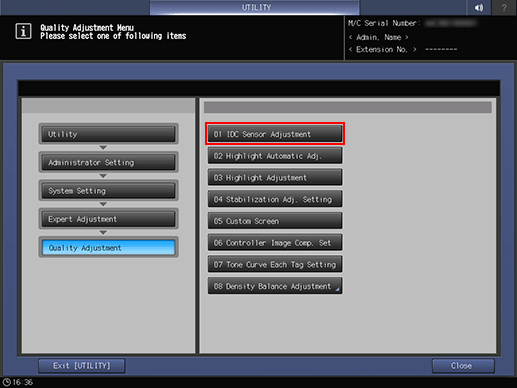
Follow the procedure on Displaying the [Administrator Setting Menu] Screen to display the Administrator Setting Menu screen.
Press System Setting on the Administrator Setting Menu screen, and then press Expert Adjustment, Quality Adjustment, and IDC Sensor Adjustment in sequence.
The IDC Sensor Adjustment screen is displayed.
Select the screen to be adjusted.
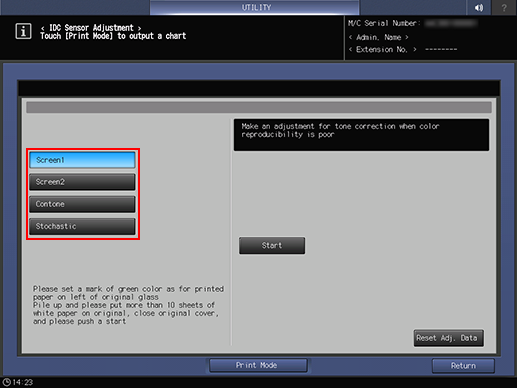
supplementary explanationThe screens provided here are the same as those provided in the Highlight Adjustment.
supplementary explanationTo clear the colorimetric data currently set on the machine and restore the data in ROM, press Reset Adj. Data. Press Yes on the dialog. Or, press No to cancel resetting the data.
Press Print Mode.
The PRINT MODE screen is displayed.
Select A4 long edge feed paper, then press Start on the control panel.
A test pattern is printed, and the screen automatically returns to the IDC Sensor Adjustment screen.
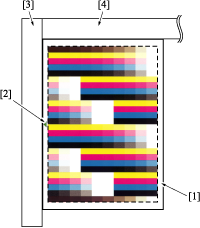
Place the output test pattern on the original glass.
supplementary explanationPosition the arrow mark 2 of test pattern 1 at left, and face the print side downward.
supplementary explanationCarefully align the test pattern 1 to the vertical original size guide 3 and horizontal original size guide 4 on the original glass.
supplementary explanationPlace about 10 sheets of blank copy paper on top of the test pattern 1.
supplementary explanationClose the ADF.
Press Start on the screen, or Start on the control panel. The machine starts the adjustment automatically.
supplementary explanationIf any problem is found, an error code will be displayed to indicate the cause for each. Consult the following table to fix the errors.
Error code
Error
Remedy
Error 1
Register marks cannot be detected
Reset the chart in the correct position.
Error 2
Chart is positioned upside down
Reset the chart in the correct position.
Error 3
Pattern of chart cannot be detected
Use the correct chart.
Error 4
Adjustment is unavailable
Contact your service representative.
Error 5
Out of standard range
Make the readjustment.
Error 6
Nonvolatile data error
Check the installation of memory board.
Error 7
Accessed undesignated memory
Contact your service representative.
Error 8
Error related to memory
Contact your service representative.
Error 9
Program error
Contact your service representative.
Error 10
Chart is skew
Use the correct chart.
Error 11
Failed in scanning the image header information
Contact your service representative.
Error 12
RGB data error
Check that the chart is correct, and contact your service representative if any solution can be found.
Error 13
Parameter setting error
Contact your service representative.
Repeat steps 4 to 7 until the message Completed is displayed.
Press Return to return to the Quality Adjustment Menu screen.
Tips
If Relay Unit RU-518 or Integrated Color Care Unit IQ-501 is mounted, a test pattern different from the above is output.
When a test pattern is output (in the same was as for steps 1 to 5), Relay Unit RU-518 or Integrated Color Care Unit IQ-501 automatically measures the test pattern.
Based on the result, the IDC sensor makes automatic adjustments, so manual adjustments (steps 6 to 8) are not required.