
Stamp: Copying with Additional Information Printed
- Overview of Stamp
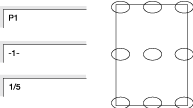
- Numbering
- Page No.
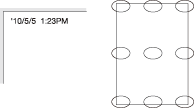
- Date/Time
- Making fine adjustment on printing position
- Changing the text size for numbering
- Start Number setting for Set Numbering mode
- Page cover and insert sheet
- Start Number/Start Page/Last Page setting for Page No. mode
- Text Size and Font settings for Page No. and Date/Time modes
- Date/Time
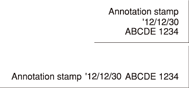
- Annotation
Overview of Stamp
Prints information not provided in the original (Numbering, Page No., and Date/Time) to a copy.
Setting options | Description (example) | |
|---|---|---|
Set Numbering |
| |
Page No. |
| |
Date/Time |
| |
Annotation | This function allows you to recall a predefined combination of text, date/time to load the original, and annotation number of the original and to print them onto output copies at the designated location. | |
Setting example | Output example | |


You can configure the following detail settings for this Stamp function.
Numbering
Print a distribution number onto the specified position of copies.
Position the original.
Press Application on the COPY screen.
Press Stamp on the Application screen.
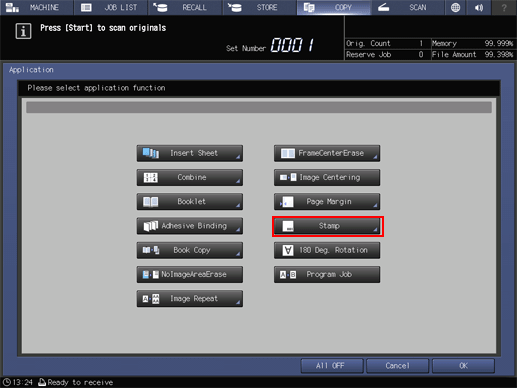
Press Set Numbering.

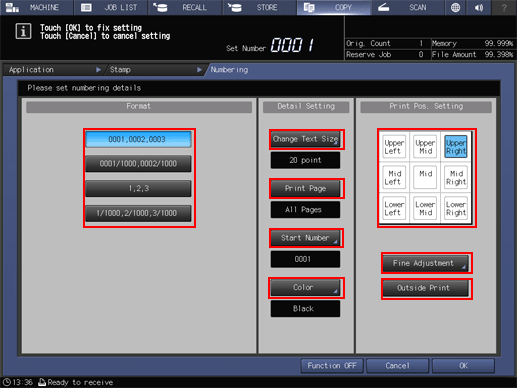
For Numbering, set Format, Detail Setting (Change Text Size, Print Page, Start Number, and Color), and Print Pos. Setting.
Setting options
Description
Format
Select one of the four numbering type keys in the Format area.
Change Text Size
Select the desired Text Size.
Print Page
Press this key to select Cover Only or All Pages.
Start Number
Press this key to specify the page to start printing.
Color
Select the desired text color from Yellow, Magenta, Cyan, Black, Red, Blue, and Green.
Print Pos. Setting
Select one of the 9 printing positions provided under Print Pos. Setting. If fine adjustment is desired, press Fine Adjustment. Press Outside Print to print numbering on the outside edges of facing pages.
supplementary explanationFor details about Fine Adjustment and Change Text Size, refer to Making fine adjustment on printing position, and Changing the text size for numbering.
Press OK twice to complete the setting.
supplementary explanationTo resume the original settings, press Cancel.
supplementary explanationTo cancel the Stamp function with the configuration information saved, press Function OFF.
Press OK on the Application screen to return to the COPY screen.
The Stamp icon and shortcut key are displayed under Application on the COPY screen.
Enter the desired print quantity from the keypad on the control panel.
Press Start on the control panel.
supplementary explanationPrinting does not start without returning to the COPY screen. Be sure to display the COPY screen.
Page No.
Print a page number onto the specified position of copies.
Position the original.
Press Application on the COPY screen.
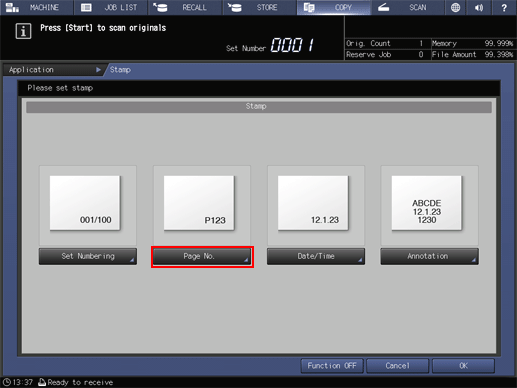
Press Stamp on the Application screen.
Press Page No..
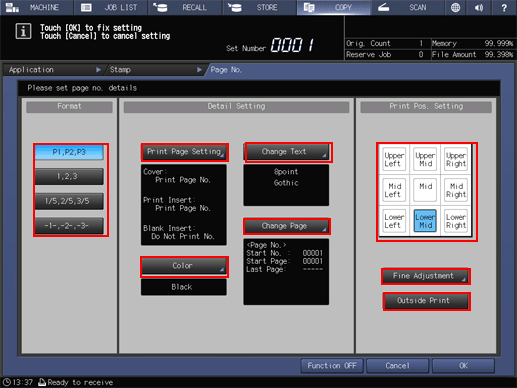
For Page Number, set Format, Detail Setting (Print Page Setting, Color, Change Text, and Change Page), and Print Pos. Setting.
Setting options
Description
Format
Select one of the four numbering type keys in the Format area.
Print Page Setting
Select whether to print data on covers or insert sheets when combining with Insert Sheet.
Color
Select the desired text color from Yellow, Magenta, Cyan, Black, Red, Blue, and Green.
Change Text
Select the Text Size and Font.
Change Page
Enter Start Number, Start Page, and Last Page.
Print Pos. Setting
Select one of the 9 printing positions provided under Print Pos. Setting. If fine adjustment is desired, press Fine Adjustment. Press Outside Print to print page numbers on the outside edges of facing pages.
supplementary explanationIf you configure Front Cover Setting, Back Cover Setting, or Insert Paper Setting in Insert Sheet, Print Insert and Blank Insert become available in Print Page Setting. When Insert Sheet is combined, configure the desired setting. Otherwise, it does not function even if configured.
supplementary explanationFor details about Fine Adjustment, Print Page Setting, Change Page, and Change Text, refer to Making fine adjustment on printing position, Page cover and insert sheet, Start Number/Start Page/Last Page setting for Page No. mode, and Text Size and Font settings for Page No. and Date/Time modes.
Press OK twice to complete the setting.
supplementary explanationTo resume the original settings, press Cancel.
supplementary explanationTo cancel the Stamp function with the current setting saved, press Function OFF.
Press OK on the Application screen to return to the COPY screen.
The Stamp icon and shortcut key are displayed under Application on the COPY screen.
Enter the desired print quantity from the keypad on the control panel.
Press Start on the control panel.
supplementary explanationPrinting does not start without returning to the COPY screen. Be sure to display the COPY screen.
Date/Time
Print date and time onto the specified position of copies.
Position the original.
Press Application on the COPY screen.
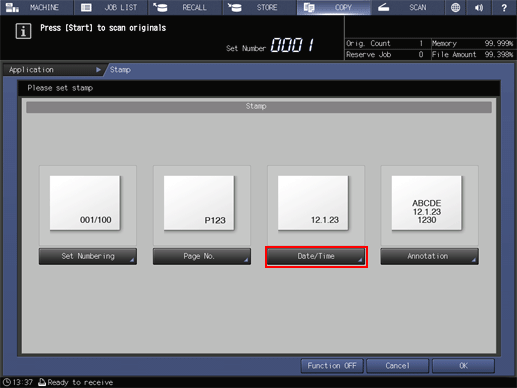
Press Stamp on the Application screen.
Press Date/Time.
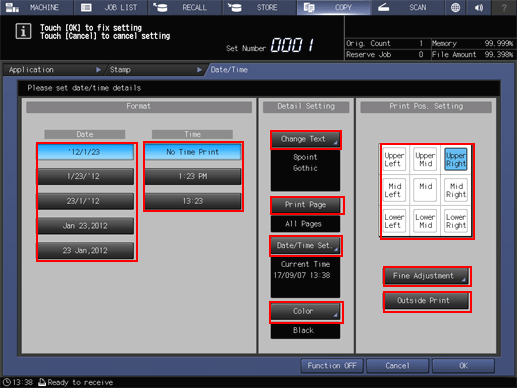
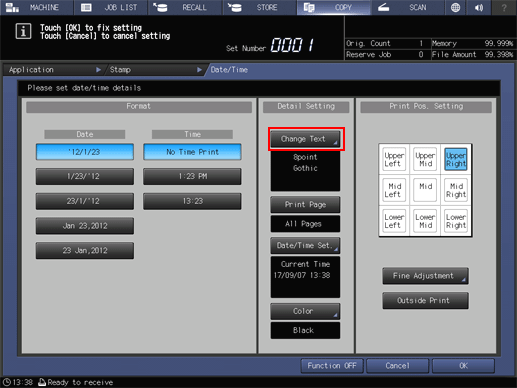
For Date/Time, set Format, Detail Setting (Change Text, Print Page, Date/Time Setting, and Color), and Print Pos. Setting.
Setting options
Description
Format
Select one of the five date type keys and one of the three time type keys in the Format area.
Change Text
Select the Text Size and Font.
Print Page
Press this key to select Cover Only or All Pages.
Date/Time Set.
Change the date and time to be printed from the current time preset to the machine to the desired one.
Color
Select the desired text color from Yellow, Magenta, Cyan, Black, Red, Blue, and Green.
Print Pos. Setting
Select one of the 9 printing positions provided under Print Pos. Setting. If fine adjustment is desired, press Fine Adjustment. Press Outside Print to print numbering on the outside edges of facing pages.
supplementary explanationFor details about Fine Adjustment, Change Text, and Date/Time Setting, refer to Making fine adjustment on printing position, Text Size and Font settings for Page No. and Date/Time modes, and Date/Time.
Press OK twice to complete the setting.
supplementary explanationTo resume the original settings, press Cancel.
supplementary explanationTo cancel the Stamp function with the current setting saved, press Function OFF.
Press OK on the Application screen to return to the COPY screen.
The Stamp icon and shortcut key are displayed under Application on the COPY screen.
Enter the desired print quantity from the keypad on the control panel.
Press Start on the control panel.
supplementary explanationPrinting does not start without returning to the COPY screen. Be sure to display the COPY screen.
Making fine adjustment on printing position
Make fine adjustments for the printing position of Numbering, Page No., Date/Time, and Annotation. Fine Adjustment is provided in the screen for each function. Pressing Fine Adjustment displays the following screen. The adjustment range is 0 to 1.96 inches (0 to 50 mm), in lengthwise direction (Top or Bottom) and in widthwise direction (Right or Left).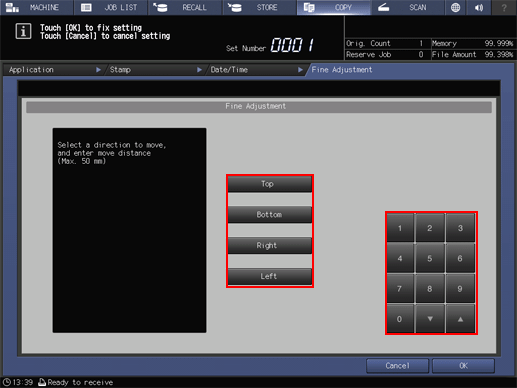
Select a direction key, then use the keypad or down / up to enter adjustment data.
To complete the setting and return to the previous screen, press OK.
Changing the text size for numbering
Press Change Text Size on the Numbering screen to display the Text Size screen.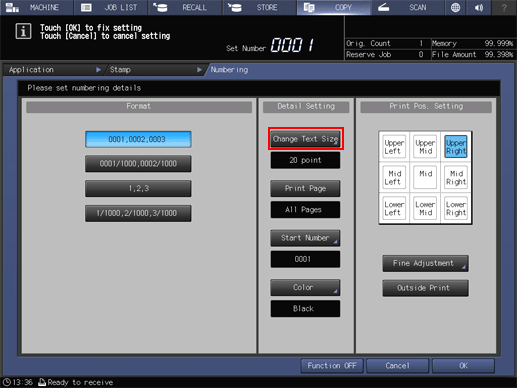
Specify the text size of numbering.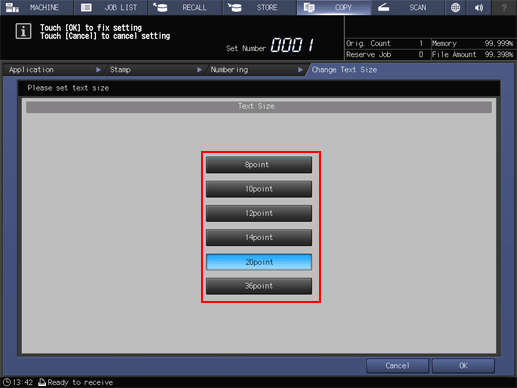
Select the desired Text Size button.
To complete the setting and return to the previous screen, press OK.
Start Number setting for Set Numbering mode
Press Start Number on the Numbering screen to display the Start Number Setting screen.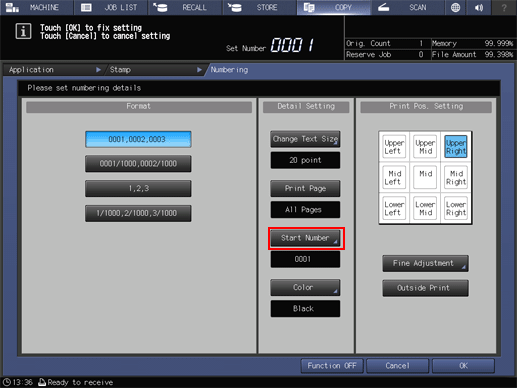
You can specify the number to start printing with.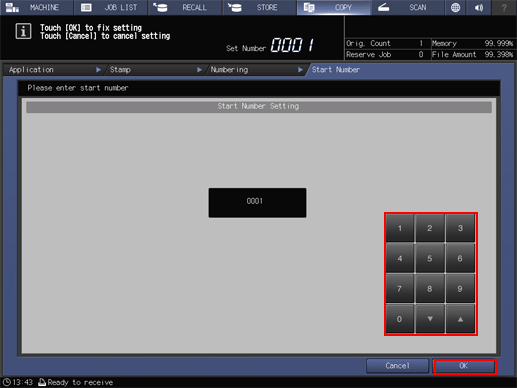
Use the keypad or down / up on the screen to enter the desired start number (up to four digits).
To complete the setting and return to the previous screen, press OK.
Page cover and insert sheet
Press Print Page Setting on the Page No. screen to display Print Page Setting screen.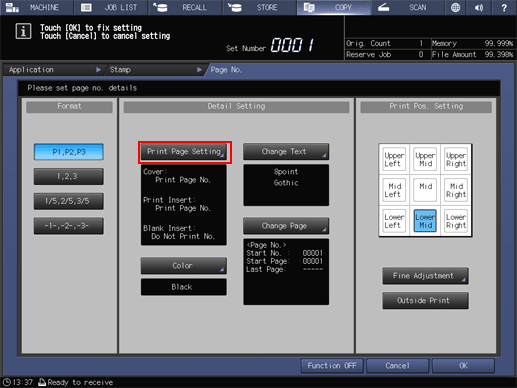
When Insert Sheet or Booklet is used together, you can specify printing onto the covers and insert sheets (printed or blank).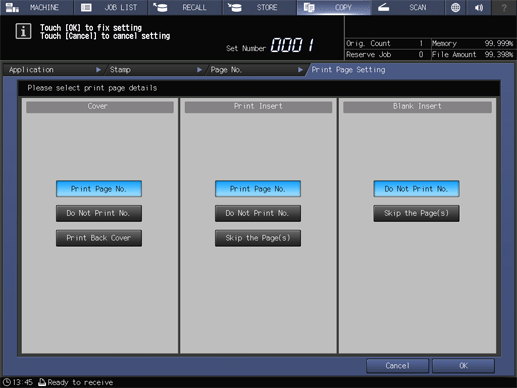
Select a key from each of the Cover, Print Insert, and Blank Insert areas.
supplementary explanationWhen Skip the Page(s) is selected, an insert sheet will not be counted as a page.
To complete the setting and return to the previous screen, press OK.
Start Number/Start Page/Last Page setting for Page No. mode
Press Change Page on the Page No. screen to display the Change Page screen.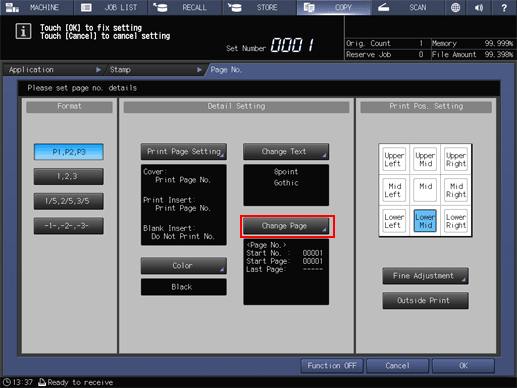
You can specify the printing start number, start page, and last page.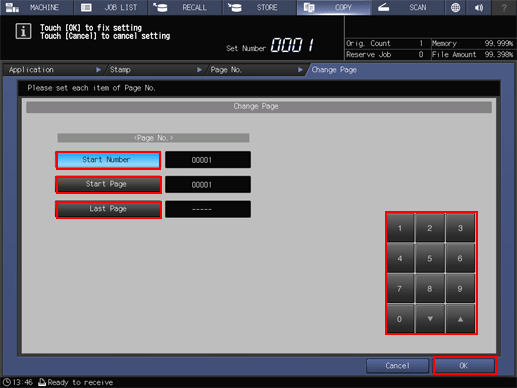
Select Start Number under Page No., then enter the desired start number.
supplementary explanationUse the keypad or down / up on the screen to enter the start number in the range from 1 to 99999. Entering 0 automatically sets the start number to 1.
Select Start Page under Page No., then enter the desired start page.
supplementary explanationUse the keypad or down / up on the screen to enter the start number in the range from 1 to 99999. Entering 0 automatically sets the start number to 1.
Select Last Page under Page No., then enter the desired last page.
supplementary explanationUse the keypad or down / up on the screen to enter the start number in the range from 1 to 99999. To print on all pages, enter 0 to display ----- (no setting).
To complete the setting and return to the previous screen, press OK.
Text Size and Font settings for Page No. and Date/Time modes
Press Change Text on the Page No. screen or the Date/Time screen to display the Change Text screen.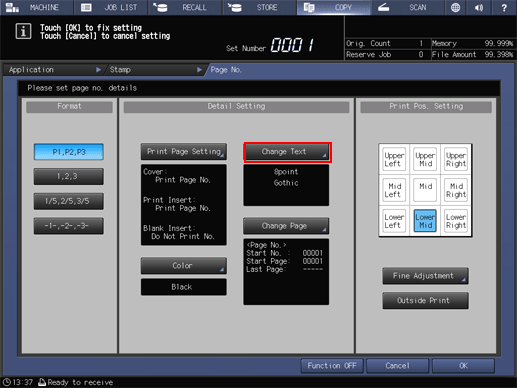
Use this function to specify the text size and font for Page No. and Date/Time.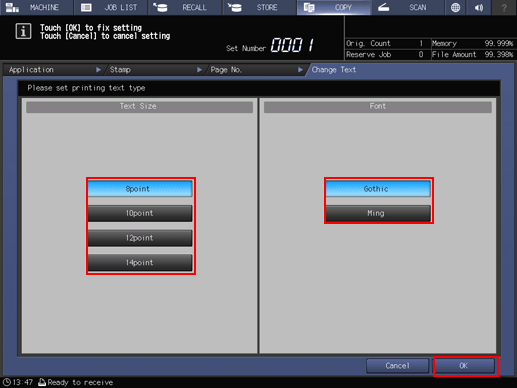
Select one of the four keys under Text Size.
Select either Gothic or Ming under Font.
To complete the setting and return to the previous screen, press OK.
Date/Time
Press Date/Time Set. on the Date/Time screen to display the Date/Time Setting screen.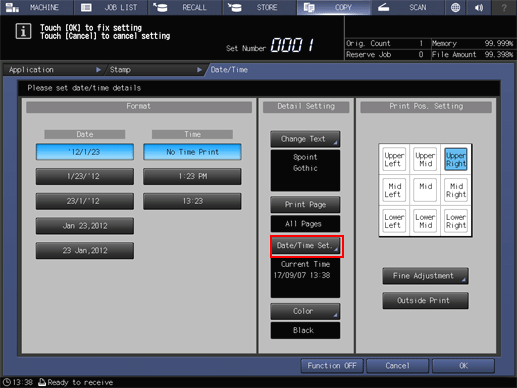
Change the date and time to be printed from the current time preset to the machine to the desired one.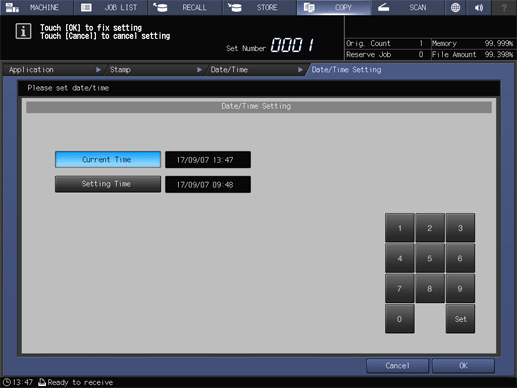
Press Setting Time.
The area on the right of Setting Time will be highlighted.
Press Set to select the part to be changed.
supplementary explanationEvery time Set is pressed, the cursor moves to the next field, in the order of year, month, day, and time. Use the keypad on the screen to enter the desired numbers.
To complete the setting and return to the previous screen, press OK.
Annotation
This function allows you to recall a predefined combination of text, date/time to load the original, and annotation number of the original and to print them onto output copies at the designated location. The annotation number can be changed temporarily on the Annotation screen after recalling the predefined setting (Temp.No.Set).
Annotation can be combined with other stamp functions.
Original | Output |
|---|---|
|
|


Settings | Output |
|---|---|
Example
Position
|
|


Reference
The administrator can change the order of text, date/time, and annotation number and whether to print/hide those in UTILITY. For details, refer to [Annotation Setting].
Tips
Up to 40 combinations of text, date/time, and annotation number can be registered.
The date/time is determined when the machine starts scanning originals, and is printed according to the setting on the machine.
The annotation number is counted for each scanned original in scanning order. The count will continue to the next job even if the machine power is turned off then on. However, the serial count is suspended if this function is not selected or Temp.No.Set is specified.
Printing position can be selected from 9 options. The fine adjustment is available up to 50 mm both in lengthwise and widthwise directions.
Position the original.
Press Application on the COPY screen.
Press Stamp on the Application screen.
Press Annotation.
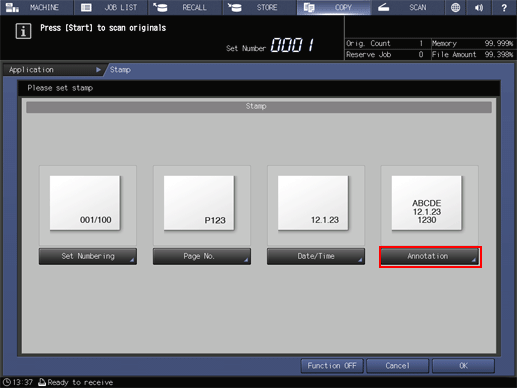
Select the desired Annotation type, then specify its printing position.
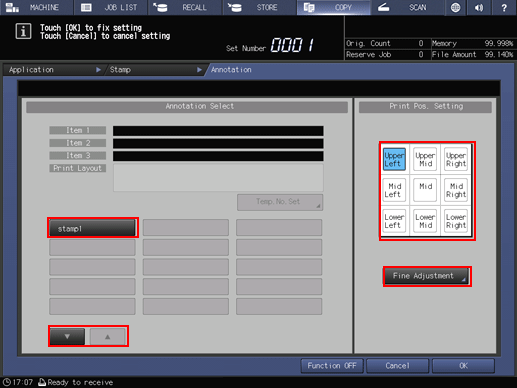
supplementary explanationUse down or up to display and select a button to recall the desired setting. The annotation setting registered on that button is displayed on the screen.
supplementary explanationSelect one of the 9 printing positions provided under Print Pos. Setting. When fine adjustment is desired, press Fine Adjustment.
supplementary explanationFor details about Fine Adjustment of the printing position, refer to Making fine adjustment on printing position.
To change the annotation number temporarily, press Temp.No.Set.
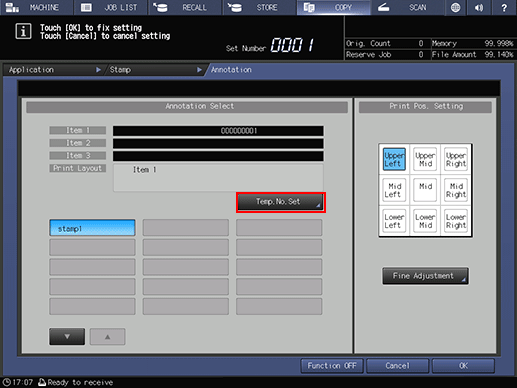
supplementary explanationIf the annotation number is not set to the button to recall the desired setting that you selected in step 5, Temp.No.Set is dimmed and cannot be selected.
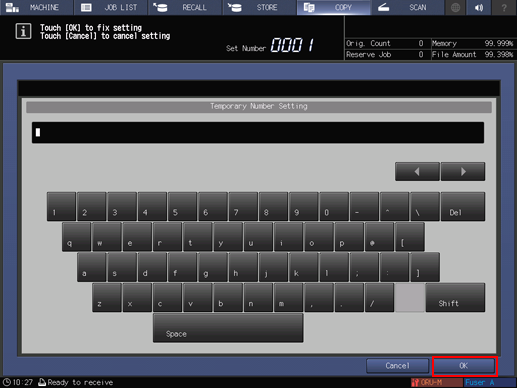
supplementary explanationPress the screen keys to enter a desired number for the temporary number. Up to 12 one-byte characters can be entered. With this setting specified, the annotation number will not be counted in the former setting. The entered temporary number will be printed on all pages.
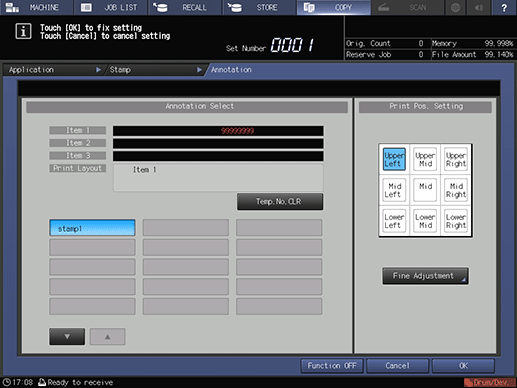
supplementary explanationIf you enter Temporary Number Setting, Temp.No.Set is changed to Temp.No.CLR. Pressing Temp.No.CLR clears the temporary number.
Press OK to return to the Annotation screen.
Press OK twice to complete the setting.
The screen returns to the Application screen.
supplementary explanationTo resume the previous settings, press Cancel.
supplementary explanationTo disable the function while keeping the current setting, press Function OFF.
Press OK on the Application screen to return to the COPY screen.
The Stamp icon and shortcut key are displayed under Application on the COPY screen.
Select additional copy conditions, as desired.
Enter the desired print quantity from the keypad on the control panel.
Press Start on the control panel.