
CD-Mag. Adjustment
Adjust the magnification in crosswise direction in the printer engine.
Objects of adjustment:
Side1: Printer CD-Mag.
Side 2: Tray1 Offset (ADU), Tray2 Offset (ADU), Bypass Offset (ADU), Tray3 Offset (ADU) to Tray11 Offset (ADU)
Press Adjustment on the MACHINE screen to display the Adjustment Menu screen.
Press Machine Adjustment, Printer Adjustment, and CD-Mag. Adjustment in sequence.
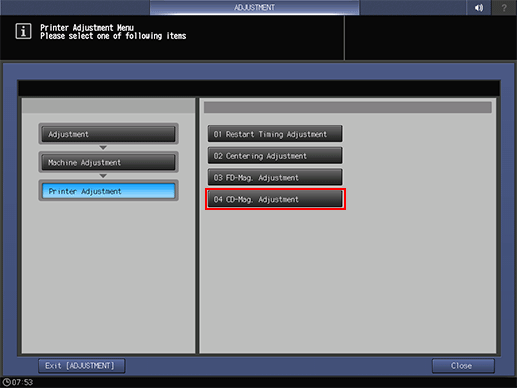
Press the key of the object to be adjusted.
supplementary explanationWhen adjusting the front side, select Printer CD-Mag.. The back side and all the trays are adjusted collectively.
supplementary explanationWhen fine-adjusting the back side, select the tray you want to adjust.
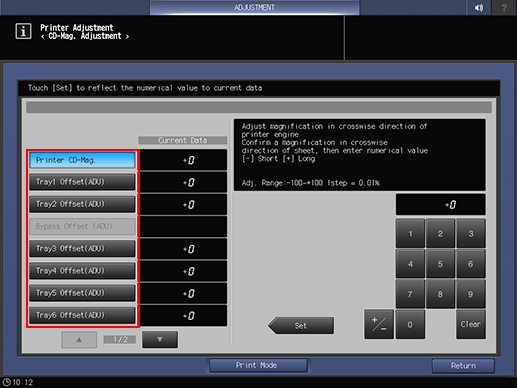
Press Print Mode.
Load A3 short edge feed paper or 11 17 short edge feed paper into the tray to be adjusted, then select that tray.
Press Start on the control panel.
A sample pattern will be output.
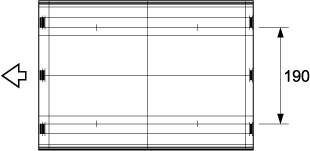
supplementary explanationOn the front side of the chart,
 mark will be printed so that you can tell which tray is used to print the chart. For details, refer to Chart.
Measure the resultant magnification in the direction perpendicular to the paper feed direction.
Allowance: ± 0.5% or less
Within 190 mm ± 1 mm
If any adjustment is required, press Exit PrintMode to return to the CD-Mag. Adjustment screen.
Use the touch panel keypad or the keypad on the control panel to enter the setting data.
Adj. Range: -100~+100 1 step = 0.01%
[-] Short [+] Long
supplementary explanationUse +/- to specify the value to be positive or negative.
supplementary explanationPress Set to change the Current Value.
Repeat steps 4 to 9 until the desired result is obtained.
Press Return.
The screen returns to the Printer Adjustment Menu screen.