
Adjusting the Z-folding Positions
Adjust the fold positions for Z-folding.
As an example, this section explains how to adjust the fold position to narrow Fold 2 by 2 mm.
Meaning and Purpose of Z-folding Position Adjustment
This function allows you to adjust the fold positions for Z-folding by specifying the desired values for Fold 1 and Fold 2.
- value: Narrows the fold width.
+ value: Widens the fold width.
Tips
Z-folding has two folds, Fold 1 (first fold) and Fold 2 (second fold) (refer to the figure shown in step 1). Each fold position can be set.


When to perform
When a fold position for Z-folding is misaligned
Intended Environment
Image Controller | Image Controller IC-605 |
Mounted finisher | Folding Unit FD-503 |
* The sample screen may be different from the actual display depending on your system environment.
Measure the misalignment 'c' of the fold position using a ruler.
Measure the 'a' and 'b' sizes in the figure below and check the difference 'c' between 'a' and 'b.'
Example: This section describes the procedure to shorten the width of "c" by 2 mm.
supplementary explanation(1) Fold 1 / (2) Fold 2
* indicates the output direction.

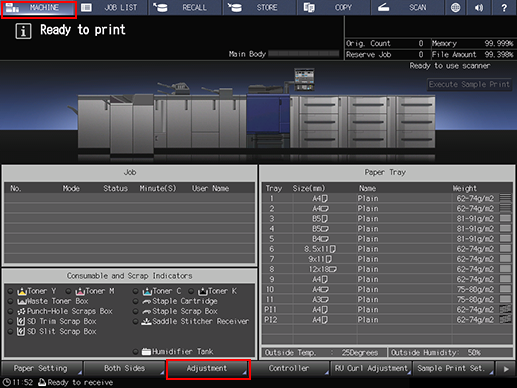
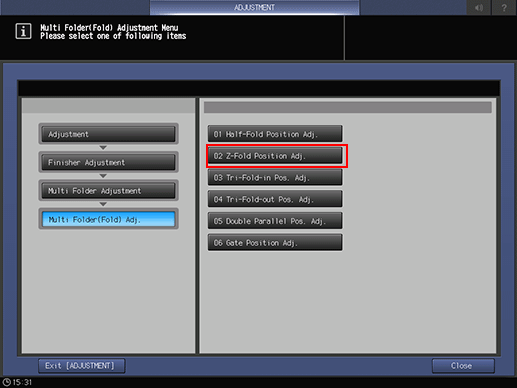
On the touch panel of the main body, press Adjustment on the MACHINE screen.
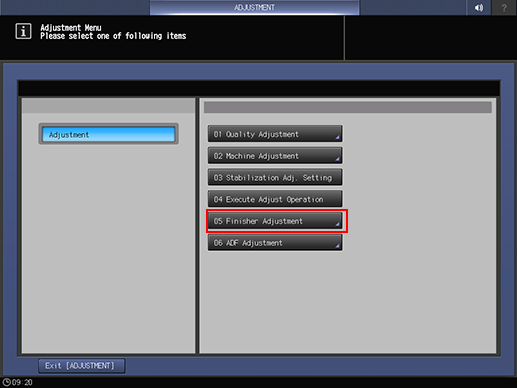
Press Finisher Adjustment on the Adjustment Menu screen.
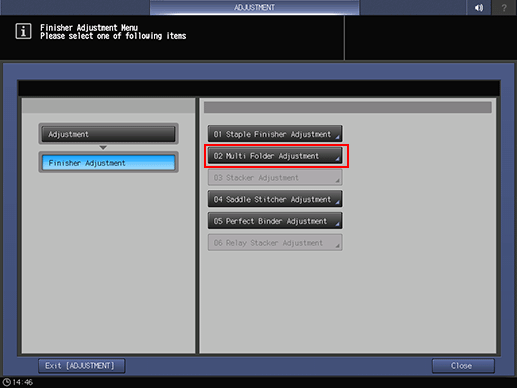
Press Multi Folder Adjustment on the Finisher Adjustment menu.
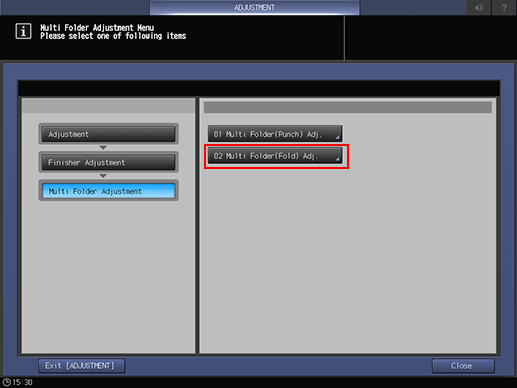
Press Multi Folder(Fold) Adj. on the Multi Folder Adjustment menu.
Press Z-Fold Position Adj. on the Multi Folder(Fold) Adj. menu.
Select the paper size and press Fold 1 or Fold 2. Enter the adjustment value and press Set.
Example: Narrow the width of "c" shown in Step 1 by shortening the width of Fold 2 for A3short edge feed by 2 mm.
Item
Setting
A3short edge feed - Fold 2
Shortening the width of Fold 2 by 2 mm (-20)
Press +/-, 2, 0, and Set in sequence; the entry value is set to [-20]. The width (b in the figure shown in step 1) of Fold 2 is narrowed by 2 mm.
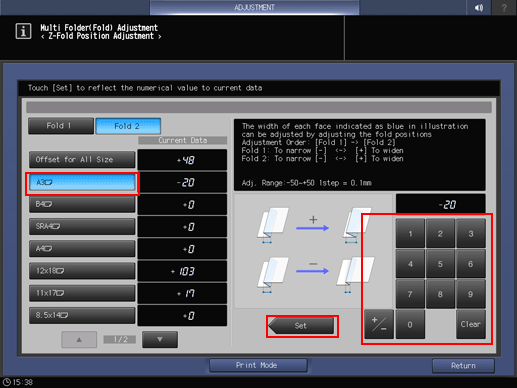
supplementary explanationPress the keypad on the screen to set the value.
supplementary explanationUse +/- to specify the value to be positive or negative.
supplementary explanationThe values are in 0.1 mm increments. (1 = 0.1 mm)
supplementary explanationWith a specific paper size selected, the set value becomes the sum of the entered value and the value previously specified for Offset for All Size.
supplementary explanationPressing Print Mode switches the mode to print mode, which allows you to print the original.
Print the original again with Z-folding and check the fold positions.
Repeat the above steps until misalignment is cleared.
