
IPsec Setting
IPsec Setting (IKEv1 Setting)
Specifies the IKEv1 setting.
Access IPsec to display the IPsec Operation Selection screen.
Select the [IPsec Setting] radio button, and click [OK].

The [IPsec Setting] screen is displayed.
Click [Edit] of [IKEv1].
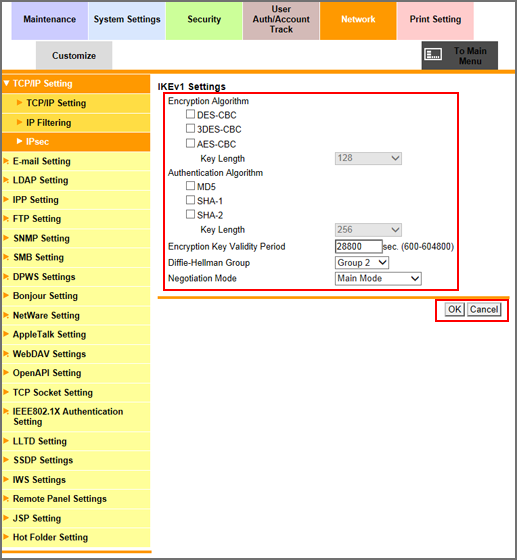
Specify [Encryption Algorithm] you want to use when generating a common key used for communication.
Select the checkbox of the encryption algorithm to be set. When selecting the [AES-CBC] checkbox, select the key length to be set from the [Key Length] drop-down list.
Specify [Authentication Algorithm] you want to use when generating a common key used for communication.
Select the checkbox of the authentication algorithm to be set. When selecting the [SHA-2] checkbox, select the desired key length from the [Key Length] drop-down list.
Specify the validity period of common key to securely generate a common key used for encrypting communication. Enter a desired period of time into the [Encryption Key Validity Period] text box. The available range is 600 to 604800 (seconds).
Select a group from the [Diffie-Hellman Group] drop-down list.
Select either [Main Mode] or [Aggressive Mode] from the [Negotiation Mode] drop-down list. Select the method to securely generate a common key used for encrypting communication.
Click [OK]. Clicking [Cancel] cancels the setting.
Click [OK] on the setting complete screen.
The screen returns to the [IPsec Setting] screen.
IPsec Setting (IKEv2 Setting)
Set the IKEv2 setting.
Display the [IPsec Setting] screen.
The procedures are the same as Steps 1 to 2 in "IPsec Setting (IKEv1 Setting)."
Click [Edit] of [IKEv2].
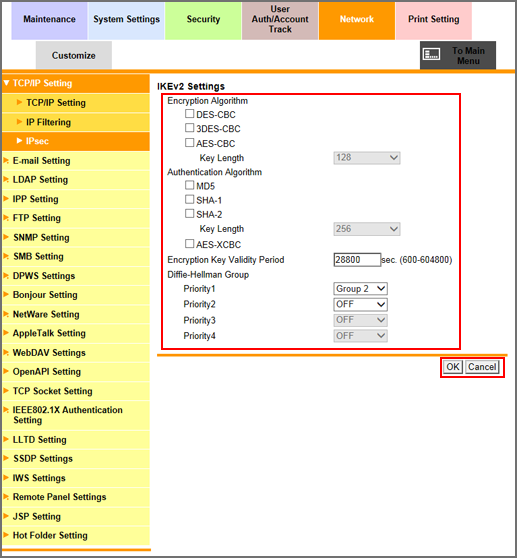
Specify [Encryption Algorithm] you want to use when generating a common key used for communication.
Select the checkbox of the encryption algorithm to be set. When selecting the [AES-CBC] checkbox, select the key length to be set from the [Key Length] drop-down list.
Specify [Authentication Algorithm] you want to use when generating a common key used for communication.
Select the checkbox of the authentication algorithm to be set. When selecting the [SHA-2] checkbox, select the desired key length from the [Key Length] drop-down list.
Specify the validity period of common key to securely generate a common key used for encrypting communication. Enter a desired period of time into the [Encryption Key Validity Period] text box. The available range is 600 to 604800 (seconds).
Set the priority of [Diffie-Hellman Group].
Select a group from each drop-down list of [Priority1] to [Priority4].
Click [OK]. Clicking [Cancel] cancels the setting.
Click [OK] on the setting complete screen.
The screen returns to the [IPsec Setting] screen.
IPsec Setting (SA Setting)
Registers Security Associations (SA) used for encrypted communication, edits the registered SA, and deletes the registered SA.
Display the [IPsec Setting] screen.
The procedures are the same as Steps 1 to 2 in "IPsec Setting (IKEv1 Setting)."
Click [Create] in [SA].
When editing the registered SA, click [Edit].
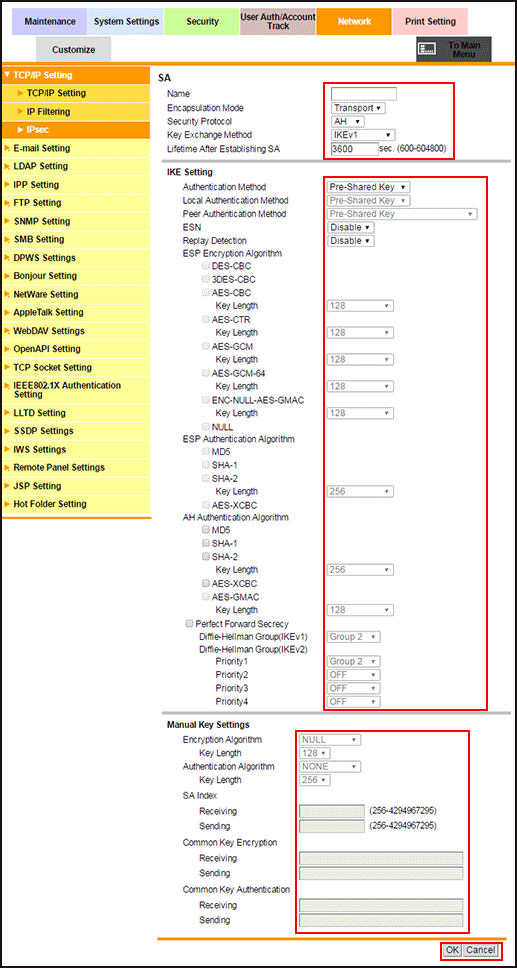
Specify the SA setting.
Enter the name of the SA in the [Name] field. Up to 10 one-byte characters can be used.
[Encapsulation Mode]: Select the IPsec operation mode.
[Tunnel End Point]: Enter the IP address of the IPsec gateway used as the peer when [Tunnel] is selected in [Encapsulation Mode].
[Security Protocol]: Select a security protocol.
[Key Exchange Method]: Select the method that safely generates the common key used for encrypted communication. When using a device that is not compatible with the automatic key exchange by IKE, select [Manual Key]; you can manually specify detailed parameters.
[Lifetime After Establishing SA]: Set the validity period of the common key generated for encryption of communication. The available range is 600 to 604800 (seconds).
Configure the settings of IKE used for this SA.
Select the options from the [Authentication Method], [ESN], and [Replay Detection] drop-down lists.
If you have selected [IKEv2] for [Key Exchange Method]. select the authentication method of the machine from [Local Authentication Method], and select the method to authenticate the peer from [Peer Authentication Method].
Select the checkboxes of [ESP Encryption Algorithm], [ESP Authentication Algorithm], and [AH Authentication Algorithm] to be set. Depending on the selected items, select the key length to be set from the [Key Length] drop-down list.
To enable [Perfect Forward Secrecy] capable of increasing the IKE strength, select the checkbox.
Select a group from the [Diffie-Hellman Group(IKEv1)] drop-down list.
Set the priority of [Diffie-Hellman Group(IKEv2)]. Select a group from each drop-down list of [Priority1] to [Priority4].
If you have selected [Manual Key] for [Key Exchange Method], configure the manual key settings.
Select an item from a drop-down list for [Encryption Algorithm] or [Authentication Algorithm]. Depending on the selected items, select the key length to be set from the [Key Length] drop-down list.
Enter a value ranging from 256 to 4294967295 in each field of [Receiving] and [Sending] in [SA Index].
Enter a key in each field of [Receiving] and [Sending] in [Common Key Encryption]. You can enter up to 64 alphanumeric characters.
Enter a key in each field of [Receiving] and [Sending] in [Common Key Authentication]. You can enter up to 64 alphanumeric characters.
Click [OK]. Clicking [Cancel] cancels the setting.
Click [OK] on the setting complete screen.
The screen returns to the [IPsec Setting] screen.
When deleting the SA, click [Delete].
Click [OK] on the confirmation screen. Click [Cancel] to cancel the deletion.
Click [OK] on the setting complete screen.
The screen returns to the [IPsec Setting] screen.
IPsec Setting (Peer)
Registers peers, edits the registered peer, and deletes the registered peers.
Display the [IPsec Setting] screen.
The procedures are the same as Steps 1 to 2 in "IPsec Setting (IKEv1 Setting)."
Click [Create] in [Peer].
When editing the registered peer, click [Edit].
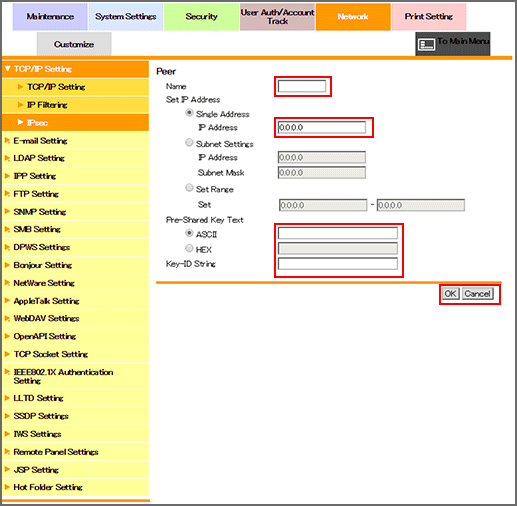
Enter the name of the peer in the [Name] field.
Up to 10 one-byte characters can be used.
Select a radio button of the [Set IP Address], and enter the IP address and other information.
Enter the Pre-Shared Key string to be shared with the peer.
[ASCII]: Enter the Enter the Pre-Shared Key text in ASCII code (up to 128 characters).
[HEX]: Enter the Pre-Shared Key text in HEX code (up to 256 characters).
Specify the same string as for the peer.
Click [OK]. Clicking [Cancel] cancels the setting.
Click [OK] on the setting complete screen.
The screen returns to the [IPsec Setting] screen.
When deleting the peer, click [Delete].
Click [OK] on the confirmation screen. Click [Cancel] to cancel the deletion.
Click [OK] on the setting complete screen.
The screen returns to the [IPsec Setting] screen.
IPsec Setting (Protocol Setting)
Registers protocol settings, edits the registered protocol settings, and deletes the registered protocol settings.
Display the [IPsec Setting] screen.
The procedures are the same as Steps 1 to 2 in "IPsec Setting (IKEv1 Setting)."
Click [Create] in [Protocol Setting].
When editing the registered protocol setting, click [Edit].
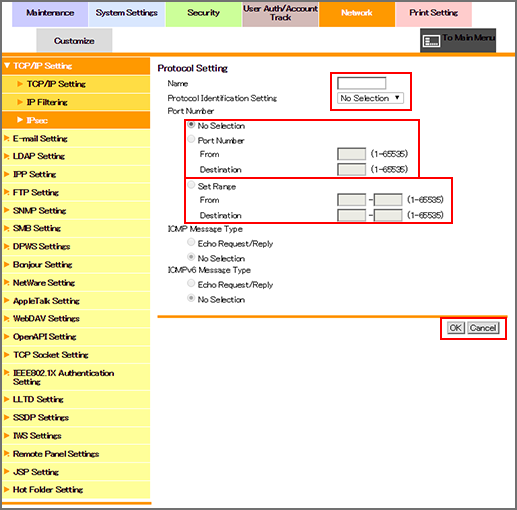
Enter the name of the protocol setting in the [Name] field.
Up to 10 one-byte characters can be used.
Select a protocol identification from the [Protocol Identification Setting] drop-down list.
If you have selected [TCP] or [UDP] for [Protocol Identification Setting], select a radio button of the [Port Number] setting, and enter the port number.
If you have selected [ICMP] or [ICMPv6] for [Protocol Identification Setting], specify a message type.
Click [OK]. Clicking [Cancel] cancels the setting.
Click [OK] on the setting complete screen.
The screen returns to the [IPsec Setting] screen.
When deleting the protocol setting, click [Delete].
Click [OK] on the confirmation screen. Click [Cancel] to cancel the deletion.
Click [OK] on the setting complete screen.
The screen returns to the [IPsec Setting] screen.