
Driver Print Setting
Click [Driver Print Setting] on the menu of [Print Setting] tab to display this screen.
This setting can be made also from [Controller] on the [MACHINE] screen. For details about the setting, refer to Driver Print Setting: Specifying Print Option Settings via Driver.
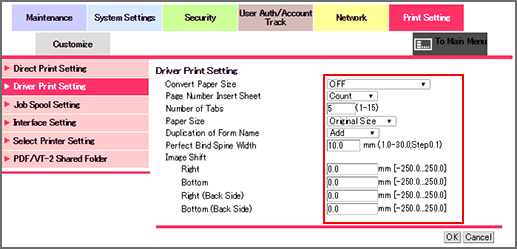
Make the settings for printing using the printer driver.
Select [OFF], [8.5 x 11/11 x 17 to A4/A3], or [A4/A3 to 8.5 x 11/11 x 17] from the drop-down list of [Convert Paper Size].
Select either [Count] or [No Count] from the drop-down list of [Page Number Insert Sheet].
Enter the desired number of tabs in the [Number of Tabs] text box. Available range is from 1 to 15.
Select either [Original Size] or [Specified Tray] from the [Paper Size] drop-down list.
Select either [Add] or [Overwrite] from the [Duplicated Form Name] drop-down list.
Enter the desired spine width of perfect-bound books in the [Perfect Bind Spine Width] text box. Available range is from 1.0 mm to 30.0 mm.
Enter a desired value of shift amount into the [Image Shift] text box.
Click [OK]. Clicking [Cancel] cancels the setting.
Click [OK] on the setting complete screen.