
Printer P: Import to the Image Controller
You can register a printer profile of [Local], [My Documents] or [Network] in [Controller].
Click [Printer Profile] on [Profile Management] screen.
Similar operation can be done by selecting, on the [File] menu, [Profile Type] - [Printer Profile].
Select the places from [Local], [My Documents] or [Network] of the tree format, where the Printer Profile is saved.
The list appears according to the selection.
Select a printer profile from the list.
Click [Import].
The [Import] screen is displayed.
When you select the multiple printer profiles, [Import] is not available.
When a folder other than [Controller] is selected on the tree view, [Import] is not available.
Similar operation can be done when you select [File] menu - [Import].
Click [Saved Name].
Up to 31 one-byte characters can be used.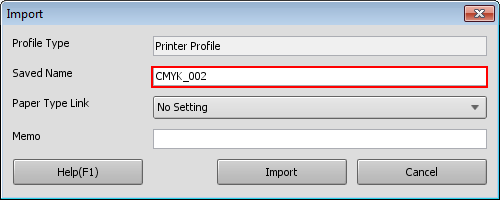
You cannot save the printer profile of the same name with those in the image controller.
Select [Paper Type Link].
If necessary, enter [Memo].
Up to 64 alphanumeric characters and symbols can be entered.Click [Import].
The printer profile is registered in the image controller.
[Import] screen is closed to return to [Profile Management] screen.