
Authentication Method: Setting the Authentication Conditions
Establish the user/account authentication settings by combining the following 9 elements.
Menu item | Description | |
|---|---|---|
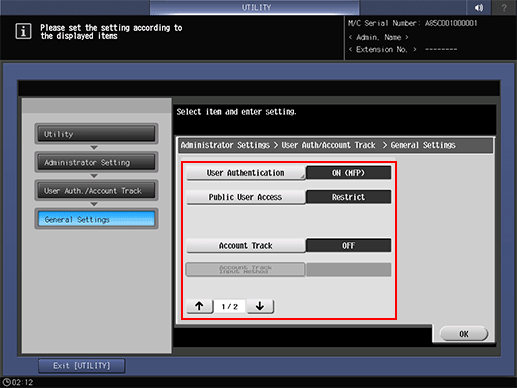
[User Authentication] | [ON]+[ON (External Serv)] | Makes users to be authenticated by using an external server. |
[ON]+[ON (MFP)] | Makes users to be authenticated directly by the operation of the machine. | |
[OFF] | Allows users to use the machine without requiring user authentication. | |
[Public User] | [ON (with Login)] | Allows users to use the machine without requiring an operation for authentication, such as entering passwords or using IC cards. |
[Restrict] | Disallows the use of the machine for public users. | |
[Account Track] | [ON] | Enables the account authentication. Selecting [ON (MFP)] or [ON (External Serv)] for User Authentication, allows you to select [Synchronize] or [Not Synchronize] for Synchronize User/Account Track. |
[OFF] | Disables the account authentication. | |
[Account Track Input Method] | [Account Name & Password] | Selectable when you select [OFF] for User Authentication and [Manage] for Account Track. An account name and account password are required for account authentication. |
[Password Only] | Selectable when you select [OFF] for User Authentication and [Manage] for Account Track. An account password only is required for account authentication. | |
[Synchronize User Authentication & Account Track] | [Synchronize] | Selectable when you select [ON (MFP)] or [ON (External Serv)] for User Authentication and [ON] for Account Track. Users who registered an account can get authenticated by entering a user name and user password only. |
[Do Not Synchronize] | Selectable when you select [ON (MFP)] or [ON (External Serv)] for User Authentication and [ON] for Account Track. Depending on the selection of Account Track Input Method, you may be required to enter an account name in addition to a user name, user password, and account password. | |
[When # Of Jobs Reach Maximum] | [Stop Immediately] | The machine stops the job operation immediately as soon as the upper limit is reached. In this case, output data and scan data will not be retained. |
[Stop After Print] | The machine does not stop the job operation even though the upper limit is reached. After completion of that job, the machine becomes unavailable for use. | |
[Warning Only] | The machine displays the message to inform you that the upper limit is reached, however, it allows the next job to be operated. The message is not displayed in the case of a print job. | |
[Number Of User Counters Assigned] | Enter the number of User Authentication to distribute a total of 1,000 authentication entries. The number of entries for Account Track will be the remainder after subtracting the set number from 1,000. | |
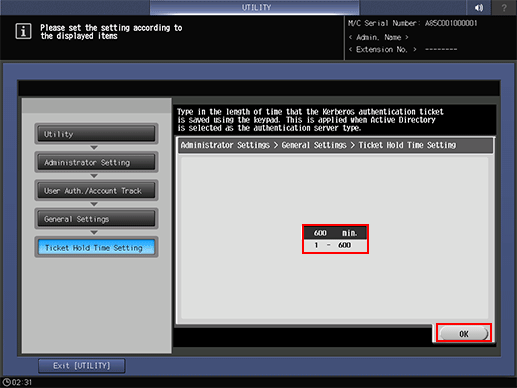
[Ticket Hold Time Setting] | This setting is applied when Active Directory is selected as the server type for external server authentication. Set a value in the range of 1 min. to 600 min. | |
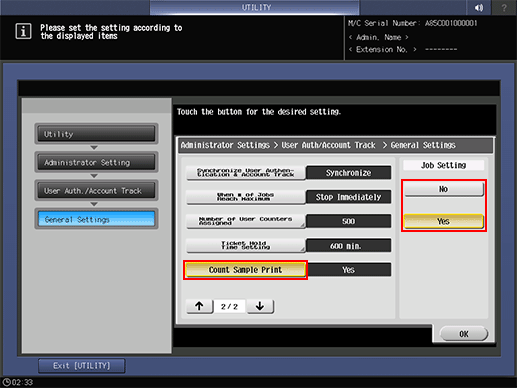
[Count Sample Print] | [Yes] | Includes the page count of sample prints into the counter. |
[No] | Excludes the page count of sample prints into the counter. | |
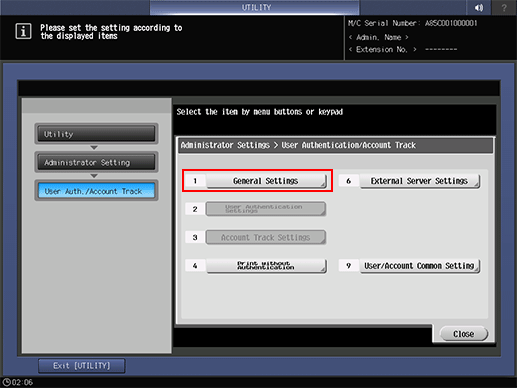
Follow the procedure on Administrator Setting to display the [Administrator Setting Menu] screen.
Press [User Auth./Account Track] on the [Administrator Setting Menu] screen, and then press [Authentication Method].
The [Authentication Method] screen is displayed.
Press [ON], and select any button.
If you have selected [ON], select [ON (MFP)] or [ON (External Serv)].
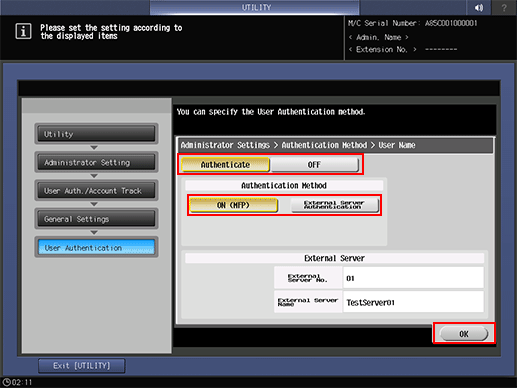
Press [OK] to return to the [Authentication Method] screen.
[Public User], [Account Track], [Account Track Input Method]Select any button displayed at right.
Press each button and select the set value displayed at right.
Press [
 ] and select [SynchronizeUser/AccountTrack] or [Upper Limit Achieve Movement].
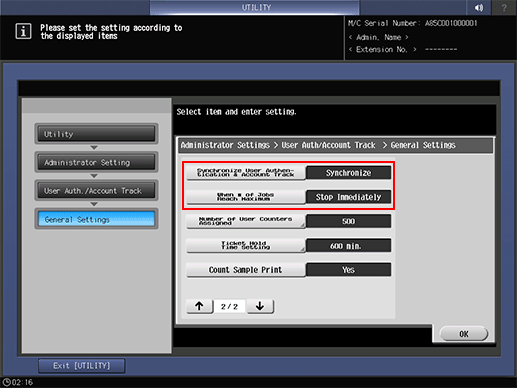
Press [User Distribute Number] to enter the quota.
Enter a number from the keypad, and then press [OK].
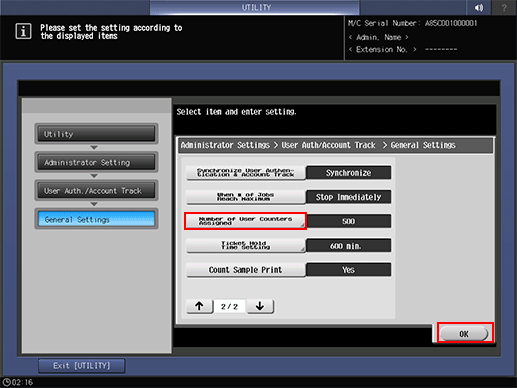
Press [Ticket Hold Time Setting], then enter the period of time.
Enter a number from the keypad, and then press [OK].
Select whether or not to include the print count of sample printing.
Press [OK] to complete the setting.
If you have changed the ON/OFF setting of [User Authentication] or [Account Authentication] or if you have changed the [User Distribute Number], a confirmation dialog is displayed before clearing all use management data including data of personal folders.
You can change the settings by pressing Yes. However, note that pressing [Yes] deletes all the administrative data related to authentication for security purposes.
To cancel the current setting, select to return the hierarchy level on the left side of the screen.